Sunken Living Rooms

Sunken living rooms are trending in interior design. Discover what they are, how they work and how to render this concept.

Sunken Living Rooms
Author
Redraw
Administrador
Use AI to delight your customers, sell more, and make your images and videos stand out in ads and marketplaces.
Sunken Living Rooms
6 min
|
18.03.2026
Author
Redraw
Administrador
Use AI to delight your customers, sell more, and make your images and videos stand out in ads and marketplaces.
[

Redraw

]

Create your free account

Start transforming your projects today using Redraw.

I want to register
Share this article

What are downgraded rooms and why are they trending

Lowered rooms, you may have recently come across photos of modern environments where the floor of the main room is, let's say, “one step below” the rest of the house. No, no one forgot to finish the slab or made a mistake with the concrete. This is the so-called lowered room, also known as sunken living or conversation pit (yes, English loves to give new names to what our grandmothers already knew!).

The concept isn't new, but the charm remains intact. A room of this type brings the floor of the living area a few centimeters, or even dozens of them, below the level of the other rooms. Sometimes it's just a “sink”, sometimes it's almost a pool (without water, please). The goal? Create a different, more intimate space and, of course, draw sighs from friends who are still attached to the concept of “straight to the end”.

The interesting thing is that, after forgotten decades, these rooms returned in 2023 redesigned, full of sophistication. Yes, now the parties no longer have shaggy carpets and strange lamps like in the 70s; but it still maintains that air of “here the conversation yields more”.

And do you know the best? Before breaking the floor of your house and embarking on the adventure of unevenness, you can now experiment and visualize what the project would be like in a realistic way, directly from the computer. With platforms like Redraw, it is possible to simulate, adjust to rendered image of lowered rooms (and avoid surprises such as bumping your head into the lamp or realizing that the sofa looked like a lost island).

The history of lowered rooms: from the 60s to the 21st century

The Golden Age (1960-1970)

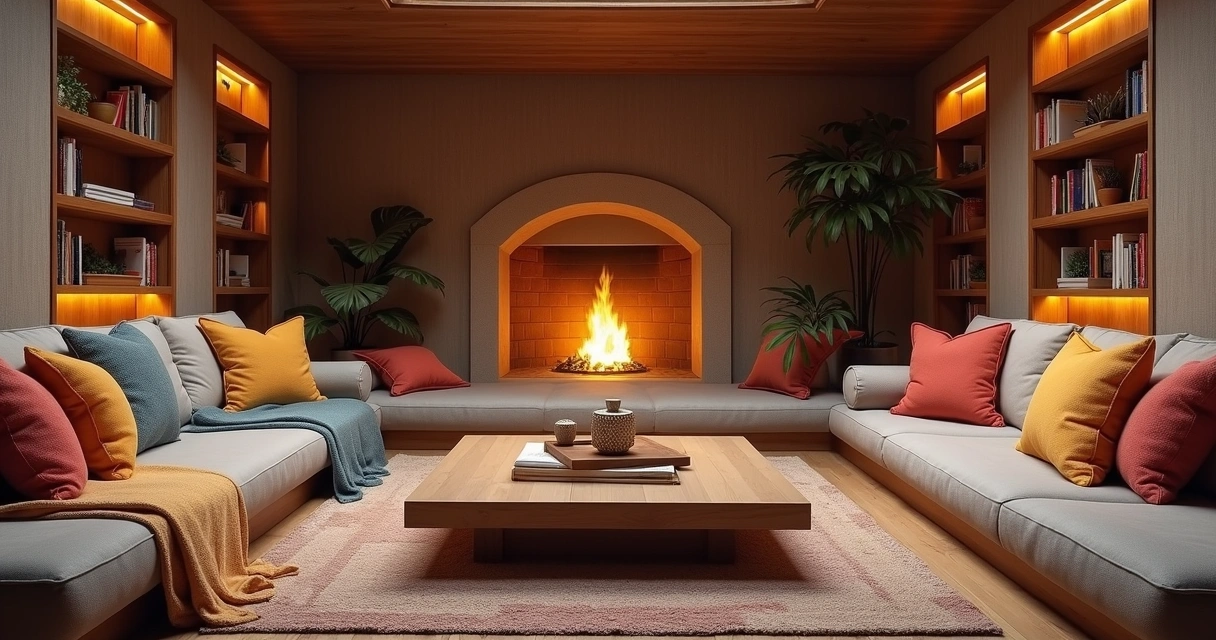
Imagine the living room of a modern house from the 60's or 70's. The owners look like they're straight out of Audrey Hepburn parties or Madison Avenue meetings. It was the height of the lowered room: rugs, cushions, low fireplaces... everyone “thrown” almost at floor level around a table, talking, listening to records, or just philosophizing. It was the “chic of the moment”.

Salas rebaixadas

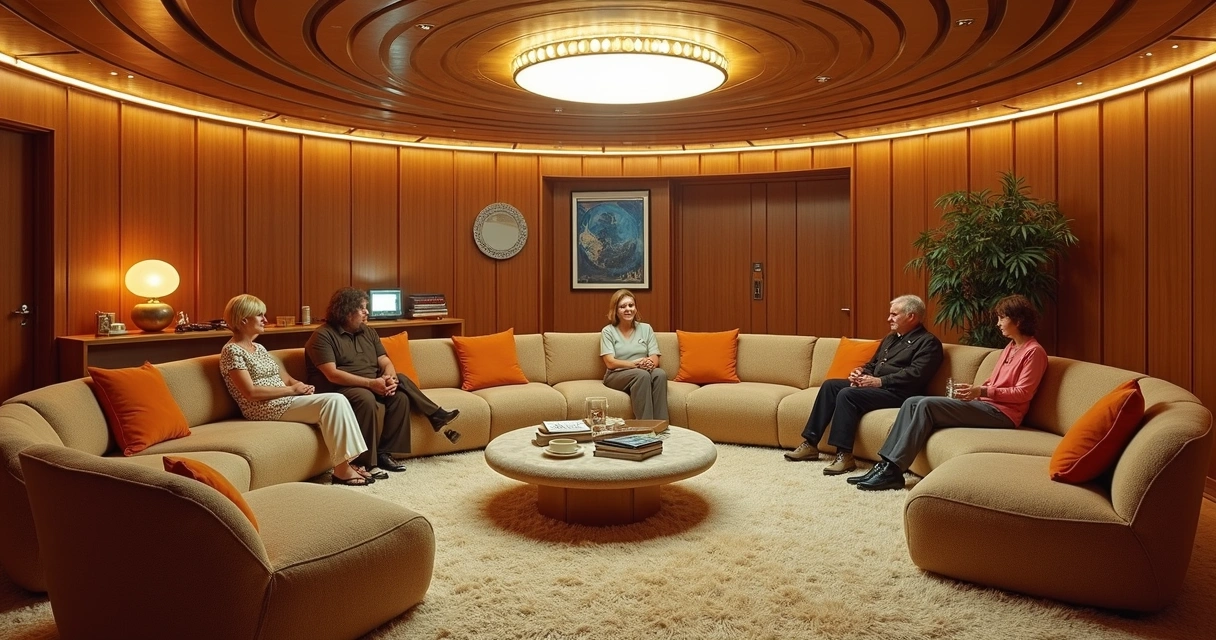
The effect was sophisticated and bold, perfect for those who wanted to impress at the time. The architectural films and magazines of that period gave the feeling that those who had such a room were more cool, more open to new experiences. Everything had the scent of modernity and a slight exaggeration in the decoration.

Decline and oblivion

As with almost everything in the design, the cycle closed. At the turn of the 80s and 90s, downgraded rooms began to be seen as complicated, impractical, and even dangerous (everyone knows someone who sprained their foot there, right?). Stairs took over the projects, the floor was level. It was the sign that the reign of this trend was at an end.

Few dared to stick to the idea. The trend was flat floors, versatility and easy-to-move furniture. The rooms that survived were renovated or were given carpets covering the “hole”. The dream became just a memory, which (almost) no one missed. Almost...

The modern and sophisticated return

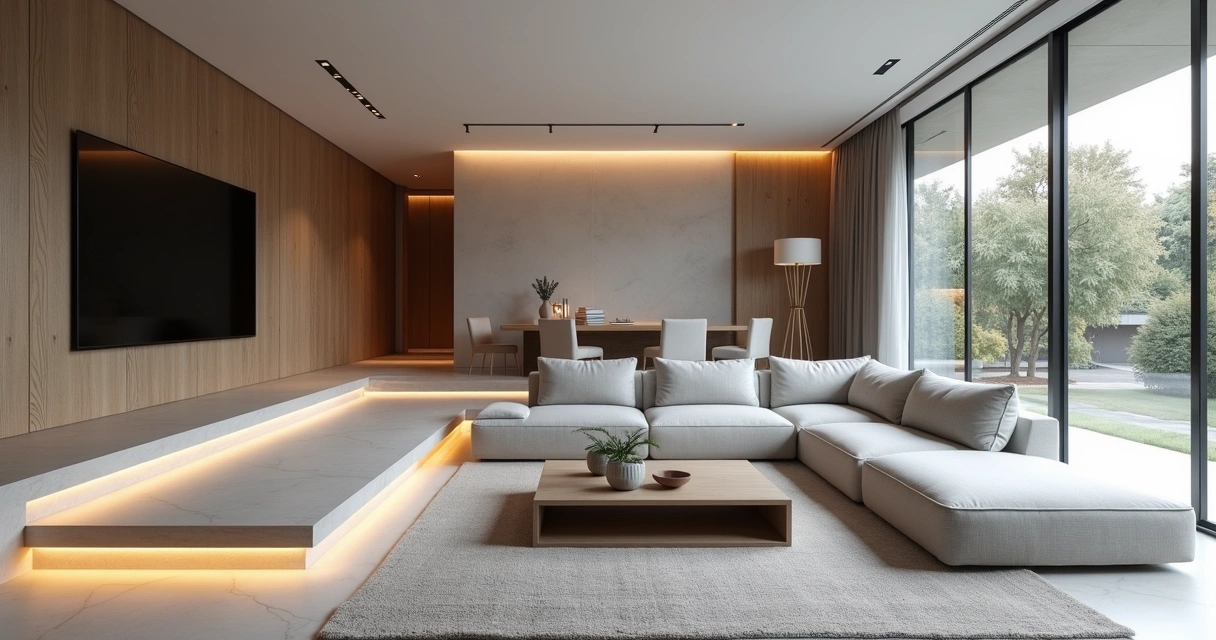
Around 2023, something changed again. Architects and designers began to revisit old references. The search for more interactive spaces, as well as the trend of integrated environments, brought back the concept of uneven rooms. But this time, without visual excesses. The look is now cleaner, using neutral colors, recessed lighting and sophisticated coatings. The main thing now is to value comfort, integration, and a sense of spaciousness.

Sala rebaixada moderna minimalista com iluminação suave

Those who know Redraw know how easy and fast it is to transform an old sketch into a modern visual proposal, testing materials, furniture and even playing with floor heights to find the ideal setting.

Anatomy of a lowered room: essential elements

Did you work up the courage to get out of the obvious? So, find out what can't be missing for the proposal to be complete (and, honestly, beautiful):

The gap: the heart of the project

The key element (no pun intended) of these rooms is the sunken floor. It can be 15, 30, even 45 centimeters below the original ground floor level. The important thing is to create a physical and visual separation from the rest of the environment. The slope can take up steps or be completed smoothly, like a large ramp, depending on the proposal and the space available.

Whatever path is chosen, the key is to ensure harmony between the “hole” and the rest of the property.

Bespoke sofas and furniture

In many projects, the sunken area is surrounded by custom-made sofas, forming a kind of “arena” of conversation. Others bet on modular armchairs that can be repositioned. The important thing is to prioritize furniture that highlights the embrace of space, those that invite you to sit back and forget about the passing of time.

Salas rebaixadas

Strategic lighting

When it comes to lighting, it's worth leaving that dark suspense movie corner. Spots embedded in the steps, floor lamps, LED strips... The objective is to highlight the unevenness and ensure a welcoming atmosphere during the day and at night. A golden tip: bet on indirect light to reinforce the intimate atmosphere.

Materials and coatings

Hardwood floors, porcelain tile, burnt cement, or even custom-made rugs are great for the recess area. The walls can gain texture or keep the same material as the rest to create continuity. It is possible to dare with colors, but honestly, when in doubt, opt for neutral tones. Thus, the space is not dated for a few years.

Those who use platforms such as Redraw can simulate material combinations before investing in renovation or furniture. It saves time, money and, above all, avoids headaches with hasty choices.

Advantages of lowered rooms

Many leave the concept behind for fear of complications. But there are several positive points, and some slightly narcissistic reasons, I must say, to consider the proposal. Let's go to the main ones:

Intimate and welcoming environment

Imagine the scene of gathering friends together for an evening of conversation. Instead of everyone scattered on chairs far apart, all together, on lower levels, almost in a circle. It's as if the living room itself encourages the exchange of ideas, laughs, and, in short, helps to forget about the cell phone.

It's an invitation to slow down and truly socialize.

Visual separation of environments

The recess serves, in a natural way, to divide integrated spaces without the need for walls or partitions. A subtle height difference already creates a clear delimitation between the living area and, for example, the dining room or the kitchen. The result? Multifunctional environments without that visual “clutter”.

Sense of spaciousness

It seems contradictory, but depressions in the floor can make a room seem even bigger. The eye follows the unevenness and, instead of seeing a single straight plane, sees different depths. It's a great visual trick for small sized apartments or homes.

Focal point and sophistication

The lowered room hardly goes unnoticed. It becomes the center of attention, the place to display an incredible carpet, a low fireplace, elegant furniture. In other words:

The downside is pure design magazine charm.

And honestly, who doesn't like to visit a house and leave saying: “did you see that different room?”

Disadvantages and important precautions

Of course, it's not all flowers. The unevenness, if not well executed or thought out, can cause some headaches (and even ankles!). Here are the main points of attention:

Accessibility issues

“Hidden” steps are beautiful in photos, but they can pose a challenge for people with reduced mobility, the elderly, or young children. In addition, poorly placed furniture or a staircase without adequate lighting increase the risk of tripping.

  • Prefer wide and safe steps.
  • Avoid slippery surfaces.
  • Focus on visual signage — tapes or built-in lighting.

Difficulty of maintenance

Cleaning hard-to-reach corners, removing dirt from built-in carpets, or changing custom-made furniture are tasks that require a little more patience.

Not to mention the “little gifts” that children and pets love to hide in the sales. If you have animals at home, the chance of finding that missing bone there is real.

Possible moisture problems

When lowering floors, there is always a risk of accumulated moisture, especially in single-storey houses or in regions with a high groundwater table. Good waterproofing and the use of suitable materials are indispensable. If moisture appears, the solution is to seek a qualified professional (and prefer to simulate the environment first using tools such as Redraw, for example).

Cost and structural viability

It is essential to consult an engineer before breaking floors and slabs. Depending on the structure of the house or apartment, it may be impractical or very expensive to carry out a downgrade. Changes to buildings, for example, are almost never allowed. And even in houses, it is necessary to check if there are pipes or beams on the site. Cheap can (literally) be expensive.

How to plan a recessed room without error

Determined to dive into this trend? So, some practical tips to not turn your dream into a headache:

  • Simulate the project: Don't rely solely on imagination. Realistic simulations, such as those made in Redraw, allow you to adjust proportions and play with materials before investing any amount.
  • Consult a professional: Architects and engineers are allied in this type of work, mainly to ensure safety and viability.
  • Think about the function: The lowered area can completely transform the use of the room, but it needs to be adapted to the routine of the house. Those who have pets or the elderly at home need to redouble their attention.
  • Invest in lighting: Don't underestimate the power of light on the steps and in the most hidden corners of the slope.
  • Opt for custom-made furniture: They fit perfectly into the space and help to enhance the concept.
  • Waterproof and prevent collisions of cutlery or silver: Metallic noises amplify the underside and any infiltration can become a domestic drama.

Frequently asked questions about downgraded rooms

What is a lowered room?

It is an environment where the living area has a floor a few centimeters or even dozens of them below the rest of the room, creating a marked difference in level. The objective is to generate intimacy, visually divide environments and bring a different charm to the decoration, taking advantage of both the modern and vintage aspect of this architecture.

How to downgrade a room?

The downgrade requires good structural planning. The first step is to consult an engineer or architect to assess the possibility, especially in apartments where there are limitations. Then, the height of the recess is defined, the steps are drawn and the waterproofing is designed. It is recommended to simulate the design in 3D, using digital platforms (such as Redraw), and only after approving the project start executing the work, always with qualified professionals.

What are the advantages of downgraded rooms?

Among the positive aspects are: creating a welcoming environment conducive to conversations, delimiting spaces without the need for walls, giving a sense of spaciousness and sophistication, in addition to transforming the lowered area into a true focal point of the house. The proposal values design and provides more collective and cozy experiences.

Are lowered rooms safe?

When well planned, they are safe. The key is to ensure proportional steps, anti-slip materials and adequate lighting, especially for the elderly, children or people with reduced mobility. Extra attention to avoid trips and falls. The virtual simulation of the steps, as is possible with Redraw, helps to predict possible risks and adjust the project before construction.

How much does it cost to downgrade a room?

The costs vary greatly depending on the size, materials and complexity of the work. In houses, the price tends to be lower; in apartments, it may not be feasible. Budgets generally include floor breaks, structural reinforcement, waterproofing, and custom-made furniture. The ideal is to simulate all the options, seek quotes from specialists and consider an investment starting at a few thousand reais, which may increase according to the degree of personalization. Using solutions such as Redraw to visualize and simulate before construction can help a lot in controlling costs.

Conclusion: the charm and functionality of the unevenness in the room

Lowered rooms aren't just a fad or a redesigned vintage touch. They represent a creative solution, full of personality, that still conquers those who want to go beyond the basics in residential design. When well planned, they are synonymous with hospitality, visual organization and modernity.

But (and there's always a “but”), every detail needs to be evaluated carefully. Plan, simulate, play with different possibilities and especially test all ideas before turning the house into a construction site. Platforms like Redraw came precisely to eliminate the fear of error and to enable fearless experimentation.

The future of design lies in boldness, but also in safety. Visualize before, perform with confidence.

If you feel like taking your projects off the ground, or simply want to understand how your house can gain another life with lowered rooms, discover the Redraw, sign up without obligation and see how 3D visualization can change the way we think about architecture and interiors.

Share this article
Summary of the content
[

Blog

]

Related articles

Access Blog
Redraw vs Enscape — comparativo de ferramentas de renderização para arquitetura
Redraw
15.05.2026

Redraw vs Enscape: Comparativo para Arquitetos 2026

Alexandre Kuhn
5 min of reading

O Enscape tem uma proposta interessante: render em tempo real, direto dentro do seu software de modelagem. Sem esperar horas. Sem sair do SketchUp ou Revit. Clicou, renderizou. Parece ideal.

E por muito tempo foi a melhor opção pra quem precisava de velocidade sem a complexidade do V-Ray ou Corona. A Chaos Group entendeu isso e comprou o Enscape exatamente por essa razão. Era pra ser a versão rápida do ecossistema deles.

Só que velocidade sem realismo resolve metade do problema. E essa é a questão central do Enscape em 2026.

O problema que ninguém fala sobre o Enscape

O Enscape renderiza rápido. Isso ninguém discute. Mas tenta entregar um render de interior com iluminação natural convincente, reflexos realistas nos pisos e texturas que não pareçam plástico. Vai gastar horas ajustando, testando, refazendo. E na maioria das vezes, o resultado final ainda fica com cara de "render de software". Falta aquele realismo que o cliente espera quando vê uma imagem de projeto.

Não é culpa de quem usa. É limitação do motor. O Enscape foi feito para ser rápido, não para competir em qualidade com V-Ray. A renderização em tempo real sacrifica cálculos complexos de iluminação global, caustics e bounce de luz. O resultado é limpo, é rápido, mas é genérico.

E mesmo sendo "rápido" no render, o setup não é. Você ainda precisa configurar materiais um por um, ajustar texturas, posicionar iluminação. A renderização em si leva segundos, mas a preparação leva horas. E aí entra a frustração: você gasta esse tempo todo e o resultado não chega onde você queria.

Enscape é um plugin (e isso importa)

O Enscape roda dentro do SketchUp, Revit ou ArchiCAD. Não funciona sozinho. Você paga a licença do Enscape mais a licença do software host.

Enscape Solo custa US$ 575/ano. Enscape Premium sai por US$ 635/ano. Some o SketchUp Pro (US$ 349/ano) ou uma licença Revit, e o custo anual passa de US$ 900 facilmente. Para um escritório com 3 pessoas, multiplica por 3.

E fica preso àqueles softwares. Se muda de SketchUp pra Blender, perde o Enscape. Se quer renderizar uma imagem rápida fora do escritório, sem o PC com o software instalado, não dá.

Como o Redraw resolve o que o Enscape não consegue

Aqui tem dois cenários.

Cenário 1: Enscape + Redraw (complemento)

Você gosta do Enscape, usa no dia a dia, e não quer mudar seu fluxo. Beleza. O Redraw entra como a camada que falta.

Renderizou no Enscape e ficou com cara de "render de software"? Joga no Melhorar Render do Redraw. Em 30 segundos, a IA melhora texturas, corrige iluminação, adiciona reflexos naturais e entrega aquele fotorrealismo que o Enscape sozinho não alcança. É exatamente para isso que a função foi feita: pegar o que softwares convencionais entregam e elevar para outro patamar.

O combo funciona bem. O Enscape dá a velocidade de preview em tempo real, o Redraw dá o acabamento final.

Cenário 2: Redraw sozinho (substituição)

Se o que você quer é o resultado final, sem se preocupar com horas de setup, o Redraw faz tudo sozinho. Tira um print do seu modelo 3D, sobe na plataforma, e em 20 a 40 segundos tem um render fotorrealista. Sem configurar material, sem ajustar luz, sem plugin.

E com qualidade superior ao que o Enscape entrega sozinho. Porque a IA do Redraw foi treinada especificamente para arquitetura. Ela entende como luz natural se comporta em interiores, como materiais refletem, como vegetação cria sombras. Coisas que no Enscape você tenta configurar manualmente e raramente acerta de primeira.

Comparativo: Enscape vs Redraw

CritérioEnscapeRedraw
Tempo de renderQuase instantâneo (mas setup leva horas)20 a 40 segundos (sem setup)
Qualidade do resultadoBoa, mas genérica. Falta fotorrealismoFotorrealista (IA treinada para arquitetura)
Hardware necessárioGPU dedicada, PC potenteQualquer PC com internet
Custo anual~US$ 575 (Enscape) + host (SketchUp/Revit)A partir de US$ 180/ano
Funciona sozinho?Não (plugin para SketchUp/Revit/ArchiCAD)Sim, direto pelo navegador
Configuração por renderManual: materiais, luz, câmeraAutomática: IA identifica tudo
Acesso remotoNão (preso ao PC com o software)Sim, 100% cloud
Variações rápidasInstantâneo no preview, mas requer ajustes manuais30 seg por variação
Realismo de iluminaçãoLimitado (tempo real sacrifica GI complexo)Alto (IA simula iluminação natural)

A conta

Para um arquiteto autônomo que entrega 30 renders por mês:

Com Enscape:

Licença Enscape Solo: US$ 575/ano

Licença SketchUp Pro: US$ 349/ano

Hardware adequado: ~US$ 2.000/ano (amortizado)

Tempo de setup por render: ~40 minutos (total: ~20 horas/mês)

Total: ~US$ 2.924/ano + 20 horas/mês de setup

Com Redraw:

Plano Basic: US$ 180/ano

Hardware: o notebook que você já tem

Tempo total: ~15 minutos/mês

Total: US$ 180/ano + 15 minutos

Economia de US$ 2.744/ano e 20 horas mensais. E com resultado final melhor.

Para quem está decidindo agora

Se você ainda não investiu no Enscape, teste o Redraw primeiro. Conta gratuita em redraw.pro, sem cartão de crédito. Faz seus primeiros renders e compara.

Se já usa Enscape e gosta do workflow, adiciona o Redraw como complemento. O Melhorar Render transforma seus renders do Enscape em resultados que antes só V-Ray entregava. Por R$ 80/mês.

E se está cansado de gastar horas configurando materiais para resultados que não chegam onde você quer, o Redraw sozinho resolve. Em segundos. Pelo navegador. Sem instalar nada.

Perguntas Frequentes

Enscape tem render fotorrealista?

O Enscape entrega resultados bons e rápidos, mas o motor de tempo real limita o nível de fotorrealismo. Iluminação global complexa, reflexos sofisticados e qualidade de textura ficam abaixo de motores como V-Ray. Em 2026, o Redraw preenche esse gap com IA: você renderiza no Enscape e melhora no Redraw em 30 segundos, ou substitui o Enscape pelo Redraw direto.

Posso melhorar meus renders do Enscape com IA?

Sim. A função Melhorar Render do Redraw foi feita exatamente para isso. Você sobe o render que saiu do Enscape e em 30 segundos recebe uma versão com texturas mais realistas, iluminação aprimorada e reflexos naturais. Sem precisar re-renderizar a cena no software original.

Enscape funciona no Mac?

Parcialmente. O Enscape tem versão para Mac apenas com SketchUp e algumas limitações de recursos versus a versão Windows. O Redraw funciona em qualquer sistema operacional pelo navegador, incluindo Mac, Windows, Linux e até Chromebook.

Qual é mais rápido: Enscape ou Redraw?

O Enscape renderiza em tempo real, mas o tempo total inclui ~40 minutos de configuração de materiais e iluminação por cena. O Redraw entrega o resultado final em 20 a 40 segundos, sem configuração manual. No fluxo completo de trabalho, o Redraw é significativamente mais rápido.

Enscape é da mesma empresa que o V-Ray?

Sim. A Chaos Group, dona do V-Ray, comprou o Enscape em 2022 para ter uma opção mais rápida no portfólio. Mesmo assim, dentro do próprio ecossistema Chaos, o Enscape não compete em qualidade com V-Ray ou Corona Render.

Qual a melhor alternativa ao Enscape em 2026?

Para arquitetos que querem velocidade e fotorrealismo no mesmo workflow, o Redraw é hoje a melhor alternativa ao Enscape. Entrega resultados em 20 a 40 segundos, custa a partir de US$ 15/mês, roda no navegador sem plugin e foi treinado especificamente para arquitetura, engenharia e design de interiores.

Teste o Redraw grátis →

Redraw vs V-Ray — comparativo de ferramentas de renderização para arquitetura
Redraw
15.05.2026

Redraw vs V-Ray: Comparativo para Arquitetos 2026

Alexandre Kuhn
5 min of reading

O V-Ray dominou a renderização por anos. Junto com o Corona Render, eram as únicas opções para quem queria resultados hiper-realistas. Nenhum outro motor de render chegava perto. Quem trabalhava com arquitetura de alto padrão, concursos ou visualização comercial não tinha escolha: era V-Ray ou V-Ray.

Mas tudo isso tinha um preço. E não estou falando só da licença.

O reinado do V-Ray (e o custo real dele)

Para dominar o V-Ray, um profissional precisava de anos de estudo. São mais de 1.000 parâmetros que, combinados da forma certa, entregam aquele nível de fotorrealismo que todo mundo reconhece. Materiais, iluminação global, caustics, GI, sampling. Cada render é uma engenharia.

O tempo de renderização também sempre foi um problema. Um render com V-Ray pode demorar de 1 a 8 horas dependendo da cena, da resolução e do hardware. Isso é 3 vezes mais que softwares como Lumion ou Enscape. E durante esse tempo, seu computador fica travado.

Falando em hardware: para rodar V-Ray com qualidade, você precisa de uma máquina séria. CPU multi-core potente, 32 GB+ de RAM, GPU dedicada. Um setup adequado custa entre R$ 10.000 e R$ 30.000.

A licença do V-Ray Solo sai por US$ 540/ano. Parece "ok" até você somar que o V-Ray é um plugin. Ele não roda sozinho. Precisa do SketchUp, do 3DS Max, do Rhino ou do Revit por baixo. Então você paga a licença do V-Ray mais a licença do software host. São duas assinaturas.

A própria Chaos Group percebeu que esse modelo estava perdendo espaço. Softwares mais simples como Lumion e Twinmotion estavam roubando mercado, mesmo entregando resultados inferiores. A resposta deles? Compraram o Enscape. Tentaram aplicar a tecnologia da Chaos em algo mais rápido. Reconheceram o problema sem dizer em voz alta.

A IA mudou o que "renderizar" significa

O momento de virada aconteceu quando ferramentas de IA começaram a entregar resultados satisfatórios em segundos. O Redraw foi pioneiro nesse movimento: renderização com IA treinada especificamente para arquitetura.

No começo, a qualidade da IA não chegava perto do V-Ray. Isso é verdade. Mas evoluiu rápido. Hoje, os resultados são hiper-realistas e mantêm fidelidade ao projeto original. Proporções, geometria, materiais. A IA não inventa. Ela renderiza o que você projetou.

E faz isso em 20 a 40 segundos. Sem configuração. Sem hardware caro. Sem curva de aprendizado de anos.

O trabalho que levava uma semana entre modelar, configurar materiais, ajustar iluminação e renderizar, hoje é feito em menos de 10 minutos com IA. Não é exagero. É o fluxo real de quem usa.

Comparativo: V-Ray vs Redraw

CritérioV-RayRedraw
Tempo por render1 a 8 horas20 a 40 segundos
Hardware necessárioCPU potente, 32 GB+ RAM, GPU dedicadaQualquer PC com internet
Custo anual (software)~US$ 540 (V-Ray) + licença do host (SketchUp/3DS Max)A partir de US$ 180/ano (US$ 15/mês)
Custo do hardwareR$ 10.000 a R$ 30.000Zero (roda no navegador)
Curva de aprendizadoAlta (anos para dominar 1.000+ parâmetros)Muito baixa (upload + gerar)
Configuração por renderManual: materiais, luz, câmera, samplingAutomática: IA identifica contexto
Funciona no notebook?Só se for workstationSim, qualquer notebook
Acesso remotoNão (Chaos Cloud cobra por hora)Sim, 100% cloud
Fidelidade ao projetoAlta (você configura tudo manualmente)Alta (IA treinada para arquitetura)

A conta que ninguém faz

Pega um arquiteto que entrega 8 projetos por mês, com 4 renders cada. Com V-Ray, cada render leva em média 2 horas contando configuração e processamento. São 64 horas por mês só renderizando.

Com o Redraw, os mesmos 32 renders levam menos de 20 minutos no total. São 63 horas devolvidas por mês.

Em custo:

V-Ray: US$ 540/ano (V-Ray) + US$ 349/ano (SketchUp) + hardware amortizado (~US$ 3.000/ano) = ~US$ 3.889/ano

Redraw: US$ 384/ano (plano Expert) + hardware zero = US$ 384/ano

Diferença: mais de US$ 3.500 por ano. E 63 horas por mês.

Para quem ainda usa V-Ray

Se você investiu anos aprendendo V-Ray e tem projetos que exigem controle absoluto de cada parâmetro, ninguém está dizendo pra jogar fora. Para animações de altíssima complexidade ou projetos onde cada detalhe de sub-surface scattering importa, o V-Ray ainda tem espaço.

Mas pergunta sincera: quantos dos seus projetos realmente precisam desse nível? Na maioria dos escritórios, 90% dos renders são para apresentação ao cliente, estudo de fachada, variações de interior. Não precisa de 8 horas de render pra isso.

E mesmo quando você usa V-Ray, o Redraw funciona como complemento. Renderizou com V-Ray? Joga no Melhorar Render do Redraw. Em 30 segundos, texturas e iluminação ganham outro nível sem re-renderizar.

Perguntas Frequentes

O Redraw substitui o V-Ray?

Para a grande maioria dos projetos do dia a dia, sim. O Redraw entrega fotorrealismo em 20 a 40 segundos, sem hardware caro, e mantém fidelidade ao projeto original. O V-Ray segue relevante em nichos que exigem controle técnico extremo, como animações complexas e visualizações para cinema. Para apresentações, portfólio e entregas de projeto, o Redraw resolve.

A qualidade do Redraw é comparável ao V-Ray?

Sim, hoje a IA do Redraw entrega fotorrealismo que impressiona até profissionais acostumados com V-Ray. A diferença é o caminho: o V-Ray exige horas de configuração de materiais, iluminação global e sampling. O Redraw chega no mesmo patamar visual em 30 segundos, sem ajuste manual.

Posso melhorar meus renders do V-Ray com o Redraw?

Sim. A função Melhorar Render do Redraw aceita imagens de qualquer software, inclusive V-Ray. Você sobe o render que já tem e em 30 segundos recebe uma versão com texturas mais ricas e iluminação aprimorada, sem precisar re-renderizar a cena.

V-Ray funciona sozinho?

Não. O V-Ray é um plugin e precisa rodar dentro de um software host: SketchUp, 3DS Max, Rhino ou Revit. Isso significa duas licenças por usuário. O Redraw funciona sozinho pelo navegador, sem instalar nada e sem depender de outro software.

Quanto custa o V-Ray por ano?

A licença V-Ray Solo custa US$ 540/ano, mas o custo real inclui o software host (US$ 349/ano para SketchUp Pro, por exemplo) e o hardware adequado (R$ 10.000 a R$ 30.000). O total anual passa fácil de US$ 3.000. O Redraw começa em US$ 15/mês (US$ 180/ano) e roda em qualquer notebook.

Qual é a melhor alternativa ao V-Ray em 2026?

Para arquitetos e estúdios, o Redraw é hoje a alternativa mais completa ao V-Ray. Entrega fotorrealismo comparável em 20 a 40 segundos, custa a partir de US$ 15/mês, roda no navegador sem hardware dedicado e foi treinado especificamente para arquitetura, engenharia e design de interiores.

Teste o Redraw grátis →

Redraw
12.05.2026

Artificial Intelligence for Architects: The Tools You Need to Know in 2026

Alexandre Kuhn
5 min of reading

Artificial intelligence is already part of the routine of anyone who designs. It isn't novelty, it isn't experimental anymore. In 2026, the question isn't “should I use AI?”, but “which tools and what for?”.

The problem is most online guides mix everything together. They drop 30 tools in a list and leave you to figure it out. In this article we'll break it down by category, only what actually works for architects, engineers and interior designers. No filler, no useless tools, only what will change your workflow.

AI rendering: where the revolution began

Rendering with AI is the highest-impact application for anyone who designs. What used to take hours with V-Ray, Lumion or Enscape now takes seconds. But not every image AI works for architecture. Let's break it down.

ChatGPT (GPT-4o)

ChatGPT generates incredible images. Anyone with a free account can ask for “modern living room with double-height ceiling” and get something visually impressive. The catch is that this isn't a render of your project. ChatGPT invents everything: proportions, materials, geometry, layout. Each generation is a different project. You don't control any of it.

For brainstorming and visual references, it works. To show a client what their project will look like, it doesn't.

Gemini (Google)

Similar pitch to ChatGPT. It generates images from text. Results improved a lot in 2026, but the core problem is the same: generic AI that doesn't understand a project. It doesn't accept 3D models, doesn't preserve fidelity, invents elements. Useful to explore ideas, not to deliver a render.

ComfyUI / Stable Diffusion

For technical users who want full control, ComfyUI with Stable Diffusion is the most flexible option. You build custom workflows, install specific LoRAs, tune every parameter. Results can be impressive.

The cost is high though: GPU of US$ 1,500 to US$ 4,000, models that weigh 80 GB+, weeks of learning curve, and constant churn (what worked last month is outdated now). For developers or AI enthusiasts, it makes sense. For the architect who wants fast day-to-day results, it isn't realistic.

Redraw: all of this inside one platform

Redraw solves what none of those tools solves alone. It is an AI platform trained specifically for architecture, engineering and interior design.

You upload a screenshot of your 3D model (SketchUp, Revit, ArchiCAD, any software) and in 20 to 40 seconds you get a photorealistic render that respects your project. No prompt. No setup. No expensive GPU. Straight from the browser.

Redraw also centralizes the best AIs in the market, all tuned for architecture: ChatGPT optimized for rendering, Gemini optimized, Nano Banana (based on Flux). Plus Redraw's own models, trained on millions of real project images, which beat any generic model on fidelity.

It doesn't stop at still renders. Redraw has its own AI video generation built for architecture, plus Veo 3 and Kling AI integrated. And its own 3D object generator for SketchUp.

In short: everything ChatGPT, Gemini, ComfyUI and Nano Banana do separately, Redraw does inside one platform, tuned for architects, for US$ 15 per month. No four subscriptions, no confusing interfaces, no time wasted adapting generic tools.

Create a free Redraw account →

Documentation and writing: Claude as your assistant

Architects don't live off renders alone. There are specifications, technical descriptions, client emails, commercial proposals, reports. All of it eats time and almost no one enjoys writing it.

Claude (by Anthropic) is the best AI for that kind of work. It handles long context, writes with technical precision, and stays consistent across large documents. You paste your brief, describe the project, and it produces a complete spec. Or reviews a technical report. Or structures a commercial proposal.

For anyone working on complex projects that demand detailed documentation, Claude saves hours of writing. And unlike generic chatbots, it doesn't invent technical info when it doesn't know. If it isn't sure, it says so.

Works on claude.ai or the desktop app. Free tier with usage limits, paid plans from US$ 20 per month.

Pricing: Limify for proposals backed by real data

This is a problem nearly every architect has: not knowing how to price work properly. You charge by gut feel, lose money without noticing, and present quotes in an Excel that doesn't sell.

Limify is a platform built to solve exactly that. It generates professional pricing proposals for architecture and engineering using real regional market data (CUB/SINAPI).

The flow is simple: you register your costs (labor, materials, travel, taxes) and Limify assembles the proposal. Four pricing models: per square meter, full project (from plan to execution following NBR 13532), render and 3D modeling, and by actual construction value.

What changes in practice:

Limify generates a shareable link of the proposal the client opens on phone or desktop. It's a polished visual presentation, with your studio branding, calculated margin and projected profit. Not a 47-tab spreadsheet. A proposal that sells.

There's also LimIA, an integrated AI that answers pricing questions in real time. “How much should I charge for an 80m² renovation in São Paulo?”, and it returns a price range based on regional data, with suggested margin.

Over 2,300 studios already use it. The numbers they report: 6 hours saved per proposal, average margin of 38%, proposal ready in 2 minutes. For anyone who has to guess pricing, it changes the game.

Free account, no credit card.

Create a free Limify account →

Social and posts: Canva

If you are an architect and need to post (in 2026, you do), Canva is the most practical tool out there. No graphic design background required. No Photoshop.

Canva has ready-made templates for Instagram, LinkedIn, Pinterest, stories, carousels. You swap images for your renders, tweak text, publish. Ten minutes to a professional post.

The free tier handles the basics. Canva Pro (US$ 13 per month) unlocks premium templates, background removal, auto-resize across formats, and their generative AI (Magic Design, Magic Eraser).

For studios that need an online presence without hiring a social media manager, Canva is the answer. Simple, fast, good output.

Video editing: CapCut and Captions

Video became mandatory for architects who want to stand out. Virtual tour of the project, before-and-after reels, concept explainer. Editing video usually eats too much time.

Two tools solve it with AI:

CapCut

CapCut (by ByteDance, same as TikTok) is a free video editor that runs on mobile and desktop. Auto-subtitles, ready templates, transitions, beginner-friendly. The free version is generous. Pro is US$ 8 per month.

For fast reels, project tours and content for Instagram and TikTok, CapCut is the most used.

Captions

Captions goes one step further: it edits the video for you. You record, upload, and the AI cuts bad takes, adds styled captions, fixes colors, even corrects eye contact. Almost like having a video editor working for you.

For architects who record content but have no time (or patience) to edit, Captions is the best pick. Plans from US$ 10 per month.

The complete architect's kit in 2026

NeedToolCost
AI renderingRedrawFrom US$ 15/month
Professional pricingLimifyFree to start
Documentation and writingClaudeFree (with limits) or US$ 20/mo
Posts and socialCanvaFree or US$ 13/mo
Video editingCapCut or CaptionsFree or from US$ 8/mo

For under US$ 70 per month, an architect has access to tools that 3 years ago would have required a full team. Renders, pricing, documentation, marketing and video. All with AI. All affordable.

Frequently asked questions

What is the best AI for architecture rendering?
Redraw is the 2026 reference. With over 200,000 users and 500,000 renders per month, it's the largest specialized AI platform for architecture. Unlike generic AIs such as ChatGPT or Gemini, Redraw preserves fidelity to the original project.

Is ChatGPT good for rendering projects?
For generating visual ideas, yes. For renders that represent the project faithfully, no. ChatGPT doesn't take a 3D model and invents elements every generation.

How can architects price work with AI?
Limify is a platform that produces professional pricing proposals using regional data (CUB/SINAPI). Includes LimIA, an integrated AI that answers pricing questions in real time. Free account at limify.pro.

What is the best AI for technical specifications?
Claude (Anthropic) is the best option for technical documentation. Handles long context, stays consistent and doesn't invent information when uncertain.

Do I need all these tools?
Not necessarily. Each solves a specific problem. If you had to start with one, Redraw is the one that delivers the most immediate impact in the day-to-day of anyone who designs.