Prompt para Renderizar com Nano Banana - Google Gemini
Prompt para Renderizar com Nano Banana - Google Gemini
A IA generativa revolucionou a renderização arquitetônica, mas exige prompts complexos e conhecimento técnico. Descubra como o Redraw simplifica esse processo,
Author
Alexandre Kuhn
Co-founder and marketing director
Alexandre is currently the marketing director, but he previously worked as an architect specializing in BIM.
6 min
|
20.03.2026
Author
Alexandre Kuhn
Co-founder and marketing director
Alexandre is currently the marketing director, but he previously worked as an architect specializing in BIM.
[
Redraw
]
Create your free account
Start transforming your projects today using Redraw.
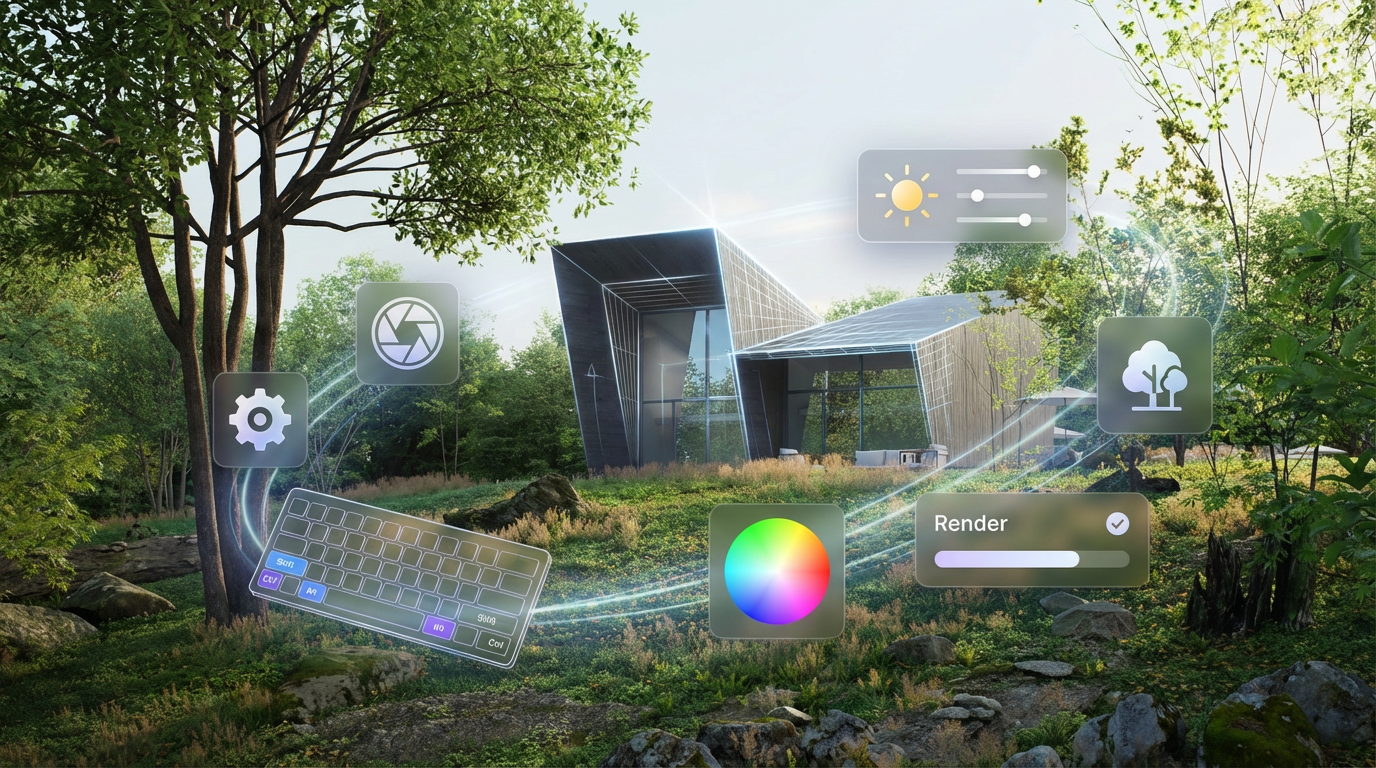
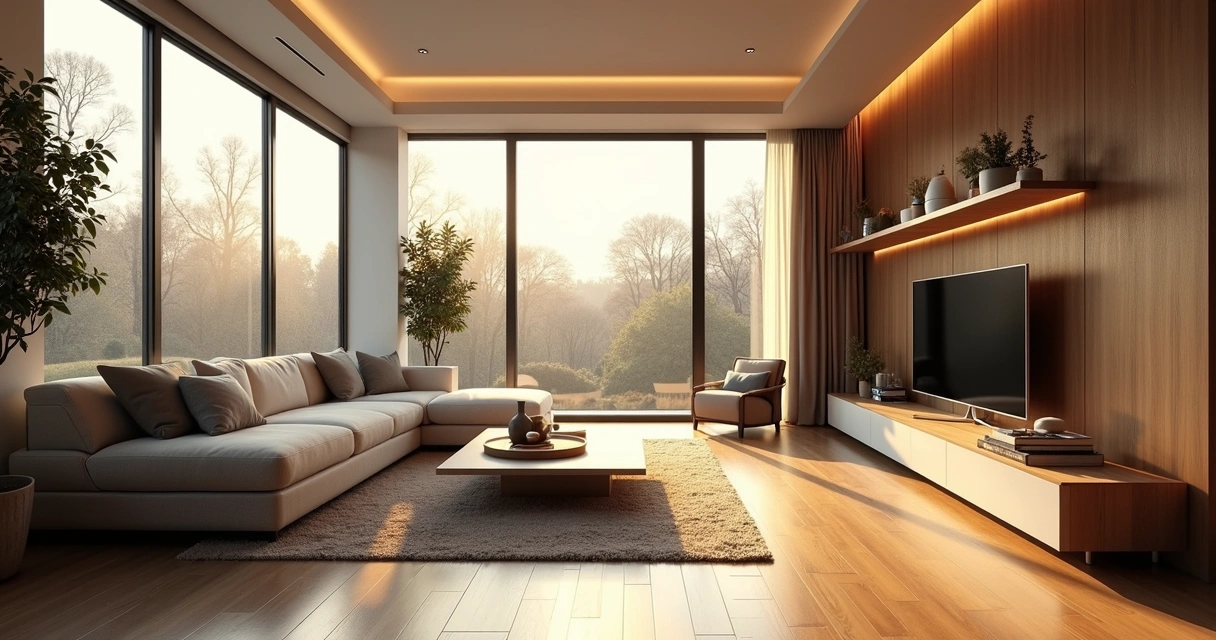
A inteligência artificial generativa transformou a forma como arquitetos e designers visualizam seus projetos. Ferramentas como o Nano Banana, com a integração do Veo 3, abriram um universo de possibilidades para a criação de imagens conceituais. Contudo, essa flexibilidade vem com uma curva de aprendizado íngreme e um processo que pode ser frustrante: a arte de escrever o prompt perfeito. Enquanto um prompt genérico pode ser poderoso, ele exige que o arquiteto se torne um especialista em engenharia de prompts, desviando o foco do que realmente importa: o design.
Neste artigo, vamos desmistificar o processo de criação de prompts para renderização em ferramentas como o Nano Banana da Google, explicar o que são os misteriosos "seeds" e mostrar por que o Redraw representa a evolução natural dessa tecnologia, oferecendo uma solução onde o arquiteto não precisa ser um programador para criar imagens espetaculares.
O Desafio do Prompt no Nano Banana
Transformando Ideias em Comandos
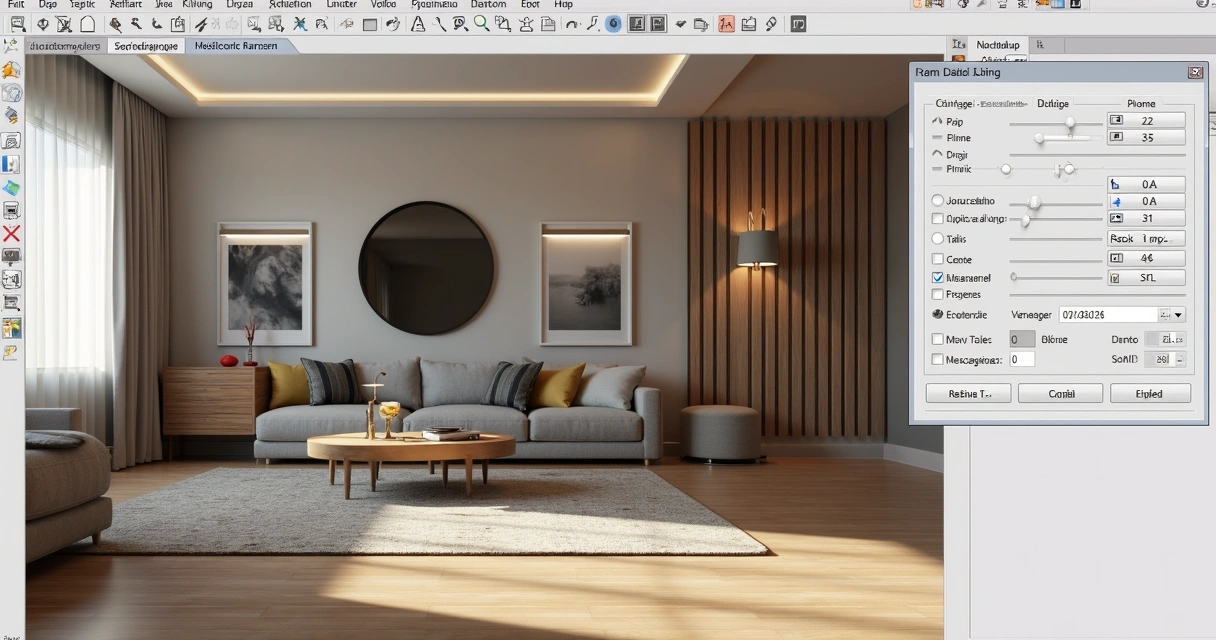
Para gerar uma imagem arquitetônica precisa no Nano Banana, não basta descrever a cena. É preciso fornecer um manual de instruções detalhado para a IA. Um prompt eficaz precisa ser uma combinação de múltiplos comandos, especificando cada detalhe para evitar ambiguidades.
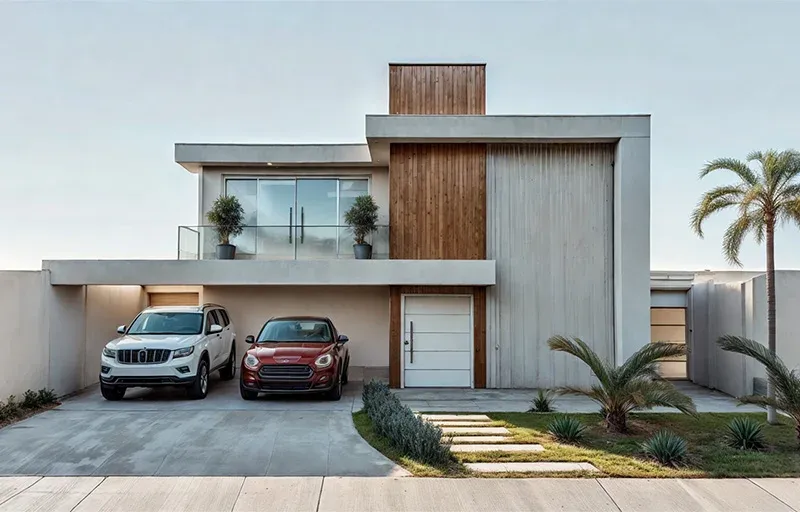
Vamos analisar um exemplo de prompt complexo para gerar uma fachada de casa moderna:
"Fotografia de uma casa moderna de dois andares com fachada de concreto aparente e painéis de madeira cumaru, grandes janelas de vidro do chão ao teto, porta de entrada pivotante preta. A iluminação deve ser dramática, com luz do sol do final da tarde criando sombras longas (golden hour). A casa está rodeada por um jardim minimalista com grama e uma oliveira. Estilo de fotografia de arquitetura, câmera Canon EOS 5D Mark IV com lente 35mm, f/8. O clima é sereno e luxuoso."
Este nível de detalhe é necessário porque a IA não tem o contexto de um arquiteto. É preciso especificar:
Sujeito: A casa e seus materiais.
Estilo: Fotografia de arquitetura.
Iluminação: Golden hour, sombras longas.
Ambiente: Jardim minimalista.
Parâmetros Técnicos: Tipo de câmera, lente e abertura.
Qualquer omissão pode resultar em uma imagem que não corresponde à visão do profissional, gerando retrabalho e perda de tempo.
O que são Seeds
Por Que Você Precisava se Preocupar com Eles?
Outro conceito técnico que assombra os usuários de geradores de imagem genéricos é o "seed" (semente). O seed é um número que serve como ponto de partida para a aleatoriedade da IA. Pense nele como o "DNA" de uma imagem. Se você usar o mesmo prompt e o mesmo seed, a IA gerará exatamente a mesma imagem todas as vezes.
Isso é útil para manter a consistência ou para fazer pequenas alterações em um resultado que você gostou. No entanto, gerenciar seeds é mais uma camada de complexidade. Você precisa encontrar o seed de uma imagem que gostou, salvá-lo e reinseri-lo a cada nova geração. Recentemente, a própria OpenAI removeu a capacidade de personalizar seeds no DALL-E 3, sinalizando que até mesmo para os criadores, essa é uma funcionalidade complexa e pouco intuitiva para o usuário final.
A Solução sem Prompt
O Redraw foi criado para eliminar essa barreira técnica. Entendemos que arquitetos e designers precisam de uma ferramenta que fale a sua língua, que entenda de materiais, iluminação e estilos arquitetônicos sem a necessidade de um manual de instruções a cada comando.
No Redraw, o prompt é simplificado porque a nossa IA já é especialista em arquitetura.
Você não precisa especificar que deseja uma "fotografia de arquitetura" ou detalhar o tipo de lente. A plataforma é treinada com um vasto banco de dados de imagens arquitetônicas de alta qualidade, permitindo que ela entenda comandos diretos como:
"É tão simples como relaxar e selecionar as opções que fazem sentido para o seu projeto. O Redraw constrói para você através de exemplos o melhor prompt." Sergio Santos - Cofundador do Redraw - Especialista em IA Generativa.
O Redraw preenche as lacunas com seu conhecimento especializado, entregando resultados de alta fidelidade com uma fração do esforço. E o mais importante: no Redraw, você não precisa se preocupar com seeds. Nossa tecnologia foi desenvolvida para oferecer consistência e variações de alta qualidade de forma intuitiva, através de uma interface visual e simples, permitindo que você refine seus projetos sem precisar de conhecimentos técnicos de programação.
Conclusão
Deixe a IA Trabalhar para Você, Não o Contrário
Ferramentas genéricas de geração de imagem são poderosas, mas exigem que o profissional se adapte a elas. O resultado é um fluxo de trabalho onde o arquiteto gasta mais tempo aprendendo a "falar com a máquina" do que projetando.
O Redraw inverte essa lógica. Nós ensinamos a máquina a entender a arquitetura para que você possa se concentrar na sua visão criativa. Acreditamos que a tecnologia deve ser uma extensão da sua criatividade, não um obstáculo. Ao simplificar o prompt e eliminar a necessidade de gerenciar tecnicalidades como os seeds, o Redraw devolve o poder ao arquiteto, garantindo que a única habilidade necessária para criar renders incríveis seja a sua paixão por design.
Está pronto para abandonar a complexidade e focar no que realmente importa? Experimente o Redraw e transforme a maneira como você visualiza seus projetos.
Generative artificial intelligence has transformed the way in which architects and designers view their projects. Tools such as ChatGPT, with the integration of DALL-E, opened up a universe of possibilities for creating conceptual images. However, that flexibility comes with a steep learning curve and a process that can be frustrating: the art of writing Perfect Prompt. While a generic prompt can be powerful, it requires the architect to become an expert in prompt engineering, shifting focus away from what really matters: design.
In this article, we will demystify the process of creating prompts for rendering in tools like ChatGPT, explain what the mysterious “seeds” are, and show why Redraw represents the natural evolution of this technology, offering a solution where the architect does not have to be a programmer to create spectacular images.
The Prompt Challenge in ChatGPT
Transforming Ideas into Commands
To generate an accurate architectural image in ChatGPT, it is not enough to describe the scene. A detailed instruction manual for the AI must be provided. An effective prompt must be a combination of multiple commands, specifying every detail to avoid ambiguities.
Let's analyze an example of a complex prompt to generate a modern house facade:
“Photograph of a modern two-story house with exposed concrete façade and cumaru wood paneling, large floor-to-ceiling glass windows, black pivoting entrance door. The lighting should be dramatic, with late afternoon sunlight creating long shadows (golden hour). The house is surrounded by a minimalist garden with grass and an olive tree. Architectural photography style, Canon EOS 5D Mark IV camera with 35mm lens, f/8. The climate is serene and luxurious.”
This level of detail is necessary because AI lacks the context of an architect. You must specify:
Subject: The house and its materials.
Style: Architectural photography.
Lighting: Golden Hour, Long Shadows.
Environment: Minimalist garden.
Technical Parameters: Type of camera, lens, and aperture.
Any omission may result in an image that does not match the professional's vision, generating rework and wasting time.
What are Seeds
Why Did You Need to Worry About Them?
Another technical concept that haunts users of generic image generators is the “seed” (headquarters). The seed is a number that serves as a starting point for AI randomness. Think of it as the “DNA” of an image. If you use the same prompt and the same seed, the AI will generate the exact same image every time.
This is useful for maintaining consistency or for making small changes to a result that you liked. However, managing seeds is yet another layer of complexity. You need to find the seed of an image you liked, save it, and reinsert it with each new generation. Recently, OpenAI itself removed the ability to customize seeds in DALL-E 3, signaling that even for creators, this is a complex and unintuitive functionality for the end user.
The Solution without Prompt
Redraw was created to eliminate this technical barrier. We understand that architects and designers need a tool that speaks their language, that understands materials, lighting and architectural styles without the need for an instruction manual at every command.
In Redraw, the prompt is simplified because our AI is already an expert in architecture.
You don't have to specify that you want an “architectural photograph” or detail the type of lens. The platform is trained with a vast database of high-quality architectural images, allowing it to understand direct commands such as:
“It's as simple as relaxing and selecting the options that make sense for your project. Redraw builds the best prompt for you through examples.” Sergio Santos - Co-founder of Redraw - Specialist in Generative AI.
Redraw bridges the gaps with its expertise, delivering high-fidelity results with a fraction of the effort. And most importantly: On Redraw, you don't have to worry about seeds. Our technology was developed to offer consistency and high-quality variations in an intuitive way, through a simple and visual interface, allowing you to refine your projects without requiring technical programming knowledge.
Conclusion
Let AI Work for You, Not the Other Way Around
Generic imaging tools are powerful, but they require the professional to adapt to them. The result is a workflow where the architect spends more time learning to “talk to the machine” than designing.
O Redraw reverses this logic. We teach the machine to understand architecture so you can focus on your creative vision. We believe that technology should be an extension of your creativity, not an obstacle. By simplifying the prompt and eliminating the need to manage technicalities such as seeds, Redraw gives power back to the architect, ensuring that the only skill needed to create incredible renders is their passion for design.
Are you ready to abandon complexity and focus on what really matters? Try Redraw and transform the way you view your projects.
Every year the market for architectural renderers changes, some alternatives appear, others cease to be relevant, software remains king of the market while some are consolidating and, in the midst of all this, in 2026, IAs are increasingly capable of generating and improving their renderings and have a promising future in sight.
This year, however, given the news and evolution of the renderers, the question is no longer which option is the best, since all of them can give you great results, but rather, which one best meets my demands.
In this article, we will show you the 8 best options at the beginning of the year for you to render your architectural projects, evaluating them based on 3 aspects: learning difficulty, price, and rendering agility.
V-RAY
V-Ray remains the first choice when thinking about rendering for architecture. It is one of the most consolidated tools and remains a reference for its precision and realism, great for offices that want to have an above average result and for studios that work with luxury real estate launches where each image needs to be like a photo.
The V-Ray engine is robust, offering rendering options via CPU, GPU, or a hybrid model. Its main advantage is full control over lighting parameters and materials. However, this control comes at a price: the learning curve is high and the time to render is the longest among the options on the list.
Positive Points:
Unquestionable quality: It remains one of the best options in terms of final quality.
Chaos Ecosystem: Perfect integration with the Chaos Cosmos (asset library) and Chaos Cloud.
Post-Production Control: Generates a wide range of Render Elements for advanced composition in Photoshop.
Interoperability: Because it's a plugin, it's a great option for offices and architects working with SketchUp.
Negative Points
Hardware Requirement: Needs state-of-the-art computers to improve quality options while reducing rendering time.
Complexity: It requires a lot of study to extract the best that the software has to offer, which can make it more difficult to start from scratch.
CORONA
While V-Ray is the precision tool, Corona simplifies some technical parameters, making it a simple option and focuses only on the essentials for a quality rendering but with results very similar to the competitor.
Corona simplified complex processes, such as LightMix, which allows you to change the intensity and color of the lights after the rendering has been completed without needing multiple renders to test day and night scenes.
It is ideal for offices focused on interior design and high-end residential architecture, it balances quality with productivity and its ability to handle lighting and complex materials (such as fabrics and woods) with little configuration effort makes it extremely efficient for medium teams.
Positive Points:
Industry Standard: It is the reference software for archviz offices and studios when it comes to realism and productivity.
Chaos Ecosystem: Like V-ray, it also has interoperability with Chaos Cosmos and Chaos Cloud.
Simplicity: It has several options that improve the user experience and make rendering easier.
Negative Points
Complexity: Despite being simple compared to V-Ray, it's still more complex to learn than many on the list.
3ds Max: Doesn't work natively with SketchUp, the most common modeling program among architects.
ENSCAPE
Enscape is the best option for the architect who seeks simplicity and wants to have quick results. The program is a plugin that runs within the most popular programs on the market (Sketchup, Revit, Archicad and Rhino), facilitating the workflow and minimizing modeling rework.
In addition, it shows your results in real time without the need for many settings in lighting and effects. Rendering previews as some programs require is not something for those who use Enscape, which requires you to render only the final version.
Positive Points:
Simplicity and Agility: Few configurations are needed to achieve a quality rendering with very low waiting times.
Chaos Ecosystem: It also includes the Chaos Cosmos and the Chaos Cloud.
Plugin: It works together within almost all architectural software.
Negative Points
Quality: Among the options on the list, it may be the one with the weakest rendering results, especially in outdoor scenes.
Customization: It allows few customizations due to its simplified interface.
TWINMOTION
Also with an extremely simple and intuitive interface, Twinmotion focuses on unique animation experiences, with simplified options that only it presents and has fast and accurate rendering. It is also compatible with several programs (SketchUp, Revit, Archicad and Rhino) through its Datashmith plugin, but unlike Enscape, it does not work internally in the programs but runs separately with automatic updates (which can be turned off) of the base model of the program you are using.
Positive Points:
Simplicity and Agility: Very low rendering and animation times and a very user-friendly interface.
Datasmith: It is compatible with most modeling programs.
Animations: There are several options to create customized animations.
Price: It's free.
Negative Points
Library: It doesn't have a robust library like the competitors.
Quality: Not up to the level of top renderers in the market.
UNREAL ENGINE
Certainly the most complex option on the list, Unreal Engine is also the software with the most possibilities among all the others, it allows you to create the most varied interactive experiences, both for an individual client and for real estate launches.
Although its differential is its interactivity, its renderings and animations leave nothing to be desired, and can be compared with images produced in Corona and with the highest rendering speed among all competitors.
Unreal, however, due to its learning difficulty, makes it a specific niche program for archviz studios or large architectural firms, but nothing prevents you from taking full advantage of this great tool.
Positive Points:
Render Speed: Almost instant renders and animations in a matter of minutes.
Interactivity: Allows delivery with fully customizable interactive projects.
Quality: It compares to the best options on the market.
Price: It's free.
Negative Points
Library: There is no native library, requiring you to do it from scratch
Difficulty: It has a very high learning curve and ended up becoming a niche option.
Heavy Hardware: This is the heaviest program on the list, requiring a very robust computer or notebook.
LUMION
Along with V-Ray, Lumion is one of the software that has dominated the rendering market in Brazil since the beginning. Because of its ease of use and vast library, they make it a relevant option today, however, with its minor updates, it makes it an increasingly less relevant alternative.
Lumion continues to have the best vegetation of all software for landscaping and has a large number of effects to customize your renderings, whether realistic or artistic, shining especially outdoors.
Positive Points:
Library: In addition to having the best vegetation, it also has numerous options to compose your indoor or outdoor scene.
Ease: It's undoubtedly the easiest and most intuitive program on the list.
Render Speed: Not the fastest option but it is among the fastest.
Negative Points
Losing Relevance: It is rapidly lagging behind the most relevant updates from competitors.
Heavy Hardware: With each new update, the program gets even heavier, requiring an extremely strong machine.
Cost: It is by far the most expensive software among the options listed.
D5 RENDER
The surprise of the rendering market and the new darling of architects, the D5 innovates by bringing ease, agility, library and integration with native AI, making it very easy to create an image, requiring only general knowledge of rendering and photography to achieve an optimal result.
Because of its free plan, it is also a great option for those architects who want to start rendering their projects and don't know where to start. This version, however, has library, functionality and AI limitations, requiring you to pay for its full version, which is not so expensive by market standards.
Positive Points:
Library: It has a great library in its paid version, limited to the free version.
Ease: Extremely easy and fast to use and render.
Cost: It offers a free version and a paid plan with affordable prices.
AI: It integrates with your artificial intelligence to save time and improve results in its paid version.
Negative Points
Heavy Hardware: Like the other options, it requires a powerful computer to be used with quality.
Free version: Although it has a free version, it is limited, compared to Twinmotion and Unreal Engine, they have a full free version.
Simplicity: Because of its simplicity, it has fewer customization parameters than more complete programs, such as V-Ray, Corona, and Unreal.
REDRAW
Unlike the other alternatives, Redraw is not a separate software or a plugin, but rather a browser AI that works anywhere you want, requiring only an internet connection.
Another difference is that you only need your modeling and only a few commands in Redraw's AI to instantly get an image to present to your client, making it the best option for architectural firms that want to save time and money by testing various alternatives until they find one suitable for your situation.
Redraw also provides integration with several other IAs, such as ChatGPT Pro and Gemini, which makes it a hub of the most powerful and innovative artificial intelligence on the market and allows you to not only create renderings but also improve those you have done in other programs, being the most versatile option on the market.
Positive Points:
Agility: Generate instant renderings from your base images.
Ease: You don't need knowledge in rendering, you can generate images from prints from your modeling program.
Versatility: Allows you to change the styles of your image, customizing your delivery to the client and also improving your renderings from other programs.
Cost: It allows free uses but has the cheapest paid plans among the options on the list.
Negative Points
Internet: It always requires an internet connection to work
AI: Technical limitations that all IAs have but which will quickly be overcome due to rapid advances and innovations in the market
Waste of Time: You will no longer be able to drink coffee and watch reels while waiting for the rendering to be ready.
CONCLUSION
There is no single answer, each situation and objective requires a specific tool, each with its positive and negative aspects. If you want quality, look for Vray or Corona. If you want agility combined with ease of learning, use Twinmotion or Enscape. If you want a vast library, Lumion, integration with AI, D5Render and interactivity, the Unreal Engine. But if you want the best of ease, agility, quality and innovation, united in a single option, Redraw is your right choice.
Redraw is ready to meet all your needs and expectations, simplifying rendering and taking it to the next level with the use of our AI specifically created for architecture.
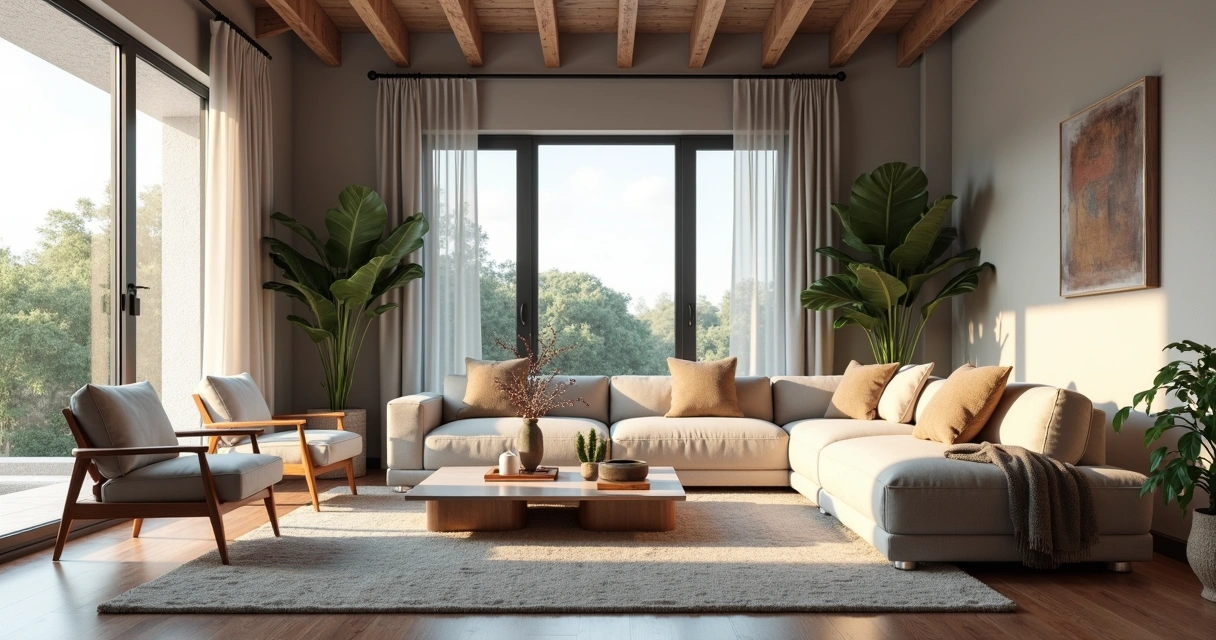
Rendering interiors is one of those challenges that seem simple only for those who have never opened a SketchUp or Revit thinking that they could achieve that super visual catalog effortlessly and, of course, without spending anything other than their daily coffee. But here comes the reality. The “interior rendering” that you dream of so much requires sophisticated software, paid plugins and hours of tweaks in every corner of the scene. And, among us, who today has time and money left? Therefore, in this guide, you will discover how to transform your experience with interior visualization, understand traditional paths and new solutions in artificial intelligence, including learning about Redraw's practical approach. Ready to evolve your images and maybe even laugh a little at the madness that this process is? Then keep reading. And if you want to streamline your projects without hurting your pocket, write down the name: Redraw.
What is interior rendering and why is it fundamental
First: rendering interiors isn't just about slapping a 3D project nicely. It's about creating a realistic final image of an indoor environment, usually from a digital model. With this, architects, engineers, designers, and companies can present to the client, investor, or team a clear and attractive view of the space, even before the first wall is erected.
Do you know that customer who “can't see”? Or that boss who asks to “seek inspiration from Pinterest”? For all of them, interior rendering plays the role of an instant translator. You show colors, textures, lighting, furniture, sensations. The result is not only more convincing: it also reduces doubts and rework, since everyone sees the project in the same way.
Time and money savings
Easy for approvals
Tests of different finishes at no extra cost
Better visual communication
With all this, there's no denying it: mastering the rendering of interior spaces is almost a must for serious professionals in the market.
Traditional software for rendering interiors: advantages and limitations
SketchUp + plugins: the most popular combination
Perhaps that is the most confusing point. SketchUp, a favorite of architects and designers, is renowned for its ease of modeling and user-friendly interface. But one truth: it doesn't do native rendering. Seriously, that magic button for turning models into realistic images simply doesn't exist by default.
To achieve a truly impressive interior rendering with SketchUp, you have to resort to external (and paid) plugins. The most sought after, such as V-Ray or Enscape, require not only financial investment, but also an understanding of a new universe of configurations: lighting, materials, reflections, cameras, etc. The result can be fantastic, provided you are patient (and persistent).
Revit and its limitations for rendering
Many engineers and architects use Revit primarily for the BIM workflow. However, for those who think that it is enough to import the model and “take a direct rendering”, frustration is common. Revit even generates images, but with, let's say, debatable quality. Those who want truly professional results, those who impress in meetings, end up looking for plugins or exporting the project to more robust software.
Specialized software: Lumion, V-Ray and Enscape
The names are famous in the professional environment. Specific rendering software promises lighting effects, ultra-realistic materials, and integration with modeling tools. Customization is the strong point, with infinite adjustments and advanced features. But here's the catch: the learning curve is normally steep, the cost is high, and performance depends on the available hardware. Who never sighed when the computer started to crash in the middle of the process?
The real cost of traditional software
If we put it on the tip of the pencil, working with rendering using conventional methods involves considerable expenses:
Program licenses (sometimes paying in dollars)
Subscription rendering plugins
Computers with powerful video cards
Time invested to learn and adjust every little detail
If rendering interiors were just a push of a button, nobody needed a 20,000 real workstation.
Therefore, seeking leaner and faster solutions makes more and more sense for those who want practicality without giving up the visual result. And no, just goodwill is not enough.
How to prepare your interior project for rendering
Before thinking about the final image, there is a whole 3D scene preparation that makes a difference both for traditional methods and for AI, such as Redraw. A good rendering starts long before “exporting” or “sending for processing”.
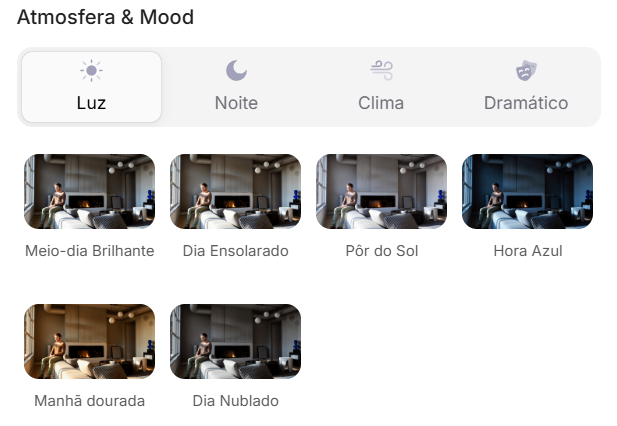
Proper lighting setup
Lighting is pretty much the secret ingredient. It sets the mood of the environment, highlights materials and even influences visual comfort. Working well with natural and artificial lights is half the way to realistic results. An error I always see? Exaggerate brightness or forget soft shadows, which makes the result more artificial than an old catalog photo.
Natural light: define the position of the sun, times, and openings.
Artificial light: think about color temperature (warm, cool, neutral), distribution of light spots, and intensity.
There's no escape: every material needs to be carefully chosen and adjusted to reflect, absorb, or transmit light in the right way. The secret to not falling into the “plastic effect” is to think about the roughness, color, reflection and even minor imperfections of the objects.
Use high-resolution textures when possible.
Diversify finishes: don't make everything shiny or all matte.
Beware of excessive transparencies on glass and acrylics.
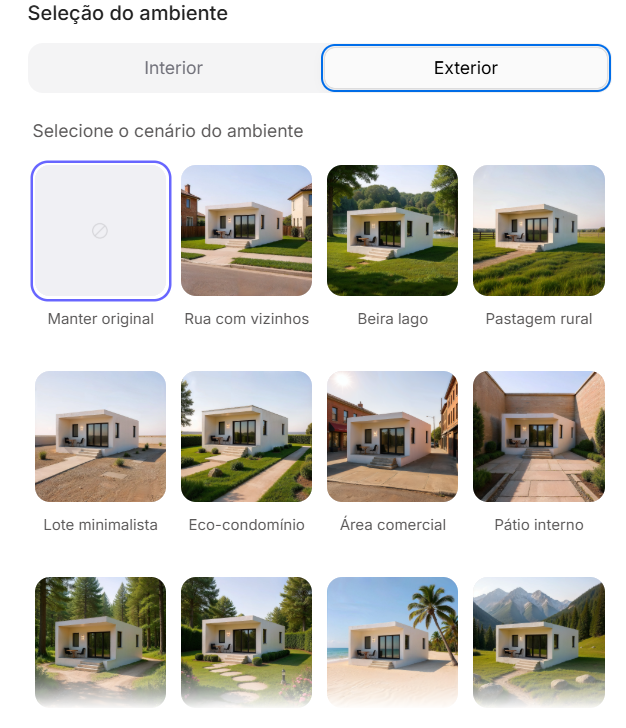
Camera positioning and composition
What's the use of a beautiful space if your camera takes up more ceiling than environment? The framework makes all the difference when reading the project. Look for compositions that enhance circulation, main lines, and bring a sense of depth.
The height of the camera is close to the eye level of the person who would be there.
Avoid distortion, especially on very open lenses.
Add elements in the foreground to create layers in the scene.
Traditional methods vs. rendering with AI: the revolution
Until recently, generate a rendered image interior design was almost a ritual of patience and hardware. Now, artificial intelligence is completely changing the game. Let's compare what changes and what remains in this new scenario.
Limitations of conventional methods
Okay, modeled, adjusted light, materials, camera. Now it's time to wait for the rendering. And there it takes minutes, hours, sometimes even more, depending on the complexity and power of the computer. The process can become an endless cycle of “rendering, correcting, rendering again”.
In addition, it is common to face:
Configuration errors that only appear in the final image
Lack of realism in reflections and textures
Limitation for last-minute quick adjustments
When the deadline is tight, the traditional surrender becomes its biggest boss.
How AI is transforming interior rendering
With artificial intelligence, there is the possibility of creating renders from static images and even sketches, saving time and freeing the professional to focus on the creative part. Trained AI models are able to understand light, perspective, and materials, suggesting realistic visuals almost instantly. The secret? Speed and simplicity, without leaving so much room for classic errors.
Advantages of Redraw for professionals
Redraw is following this innovative path. The proposal is simple: you prepare the scene, take a screenshot of your project, upload it to the platform and, in a few seconds, receive a quality rendering. No complex integration, no plug-ins or material library to install. Just a direct solution between your creativity and the final result.
It works directly in the browser, without installation
Does not require a powerful graphics card
Affordable plans for those who don't want surprises in the budget
Ideal for those who want to show ideas quickly, test finishes or surprise at meetings
Step by step: how to render interiors with Redraw
There's no secret, but the right process generates much better results. See how simple it is to incorporate Redraw into your flow:
Preparing your project in SketchUp/Revit
First truth: SketchUp and Revit They DON'T render on their own. Its role is to model the environment, detail furniture, insert components, all thinking about the angle that will be presented. Don't worry about rendering settings, focus on tidying up space, virtual lighting, and basic textures.
Capturing the ideal screenshot
Once you've adjusted the scene, frame the environment the right way. Use a high resolution, close windows and menus so as not to pollute the image. Prefer angles that enhance light, circulation, and points of interest. Simple as that. The generated file can be JPG or PNG.
Define the field of view
Centralize the most interesting area of the project
Take the capture, ensuring good resolution
A good screenshot is half the job for an amazing rendering on Redraw.
Redraw processing: from image to professional rendering
Now comes the best part. On the platform, upload your image. Redraw interprets every detail: perspective, light, textures, and transforms the file into a practically instantaneous rendering with a realistic look. There is no need to export 3D files or import plugins. The result? An interior rendering ready for presentation without a headache.
Professional tips for stunning interior renders
Even with AI facilitating the process, a professional eye is still indispensable. Choosing the right elements makes all the difference for the environment to tell a compelling story.
Natural vs. artificial lighting
Well-lit environments convey a sense of life and comfort. Switch between daylight, to enhance large, open spaces, and artificial light, to highlight specific areas such as kitchens, dining rooms, and reading corners.
Explore times of day: the morning light creates different atmospheres than the warm lights of the late afternoon
Combine types of lighting: recessed lights, sconces, floor lamps
Be careful not to pop up whites or create areas that are too dark
Composition and framing
Visual composition can transform even a simple rendering into something memorable. Think of the rule of thirds, rearrange furniture to create a flow, and don't be afraid to “cut” objects partially in the image — this suggests continuity outside the frame.
Prefer angles that show circulation and spatial relationships
Include personal objects to create realism (books, paintings, plans)
Avoid extreme symmetry: real spaces are never perfect
Details that make the difference
Almost imperceptible touches give personality to the project: finger marks on a glass, roughness of the carpet, the asymmetry of curtains. Elements such as open magazines, blankets, bottles, all of this brings the rendering closer to the photograph of an inhabited environment.
Comparison: Redraw vs. traditional software
You might be thinking, “Good, but does Redraw really deliver what it promises?” Let's look at it side by side.
Creation time: In Redraw, from upload to render, everything happens in seconds. In traditional methods, between configuration, export, and adjustment, it can be hours.
Hardware requirements: Redraw is independent of a powerful computer, since the processing takes place in the cloud. Conventional software requires machines equipped, generally with high-performance video cards.
Cost: Redraw's subscription model allows you to test without major commitments. Traditional tools require a license purchase, expensive upgrade, and often hidden hardware or plugin costs.
Ease of use: The Redraw flow reduces the learning curve, ideal for those who want to take a leap in quality without spending weeks on tutorials.
It may be that, for ultra-detailed work, classic methods still have room, but for most everyday uses, AI is already in front of even the most demanding eyes.
FAQ: frequently asked questions about interior rendering
What is interior rendering?
Interior rendering is the process of converting a digital model of an indoor environment into a realistic image, simulating light effects, materials, colors, and textures. In this way, it is possible to present to clients and teams what the space will look like after the completion of the work, even before construction begins.
What is the best 3D software for interiors?
Among the most used to model interiors are SketchUp and Revit, which are very popular for their flexibility and BIM features. However, for realistic rendering, it is necessary to use plugins or auxiliary programs. Alternatives based on artificial intelligence, such as Redraw, appear as practical options for creating realistic images from screenshots of the models made in these software.
How do I start rendering indoor environments?
The initial step is to model the environment in a 3D software of your choice, adjusting elements, lighting, and materials. Then, choose the rendering method: specific plugins, external tools, or an AI-based platform like Redraw. Be sure to prepare good frames and captures of the scenes you are going to present.
Is it worth investing in interior rendering?
Yes, especially for professionals who need to convey ideas clearly and win clients. Interior rendering reduces the risk of errors in execution, facilitates sales and negotiations, and adds value to the portfolio. With intelligent solutions such as Redraw, investment becomes even more accessible and practical.
How much does interior rendering software cost?
The costs vary widely: traditional licenses can be high, especially when adding plugins and the required hardware. AI platforms like Redraw offer diverse plans and direct browser access, saving investment in expensive machines and lengthy contracts.
Conclusion: the future of interior rendering
Coming to the end, you may have realized that rendering interior spaces may be less painful (and expensive) than you always believed. Artificial intelligence, ease of use and quick results are already a reality, especially with proposals such as Redraw. The key is to master the preparation of your project, understand the limitations and know how to choose the right method for each situation.
You can spend hours tweaking plugins, or a few seconds creating impactful images with Redraw.
Are you curious to try a new way to render your environments? Get to know the Redraw, simplify your workflow and surprise with results. Your next presentation may be just a screenshot away.


.jpg)