Insights Redraw
Redraw Updates and Trends
What's new in AI for architectural visualization.


AI for SketchUp: 10 Plugins and Tools Every Architect Needs in 2026
AI for SketchUp in 2026: the 10 plugins and tools every architect needs. From modeling to photorealistic rendering in 30 seconds.

SketchUp is the most popular modeling software among architects in Brazil and worldwide. Easy to learn, fast to use, and with a plugin ecosystem that lets you do practically anything. But SketchUp alone has limitations. It's through plugins and external tools that it transforms from a "massing software" into a complete professional tool.
In 2026, AI entered this ecosystem with force. And the best part: the most powerful AI tool for SketchUp is not a plugin. It's easier than one. But before we get there, let's cover the essential plugins every architect should know.
Modeling plugins: SketchUp at its best
These plugins solve native SketchUp limitations and give you more control over modeling.
1. Curviloft
SketchUp struggles with organic shapes. Complex curves, flowing roofs, facades with non-linear geometry. Curviloft solves this. It creates surfaces from curves, smooth transitions between different profiles, and shapes that native SketchUp simply cannot produce. For architects designing contemporary buildings with curves, it's indispensable.
Free.
2. SubD (Subdivision Surfaces)
SubD adds subdivision modeling to SketchUp. You create a simple shape (low-poly) and the plugin smooths it in real time, generating complex organic surfaces. The trick is that you work on the simple model (fast and lightweight) and switch to the smoothed version when you need to see the result. Keeps the file light while allowing advanced geometries.
Paid (~$39).
3. Profile Builder
Creates custom profiles (baseboards, moldings, channels, metal profiles) and applies them along any path. Instead of manually modeling each detail, you define the profile once and the plugin extrudes it wherever you need. Saves hours in detailing work.
Paid (~$49).
4. Skatter 2
The most powerful scatter plugin for SketchUp. Vegetation, street furniture, stones, tiles — any object that needs to be repeated at scale. Skatter distributes objects across surfaces with control over density, random rotation, and region exclusion. It turns landscaping and urban scenes that would take hours into minutes.
Paid (~$69).
5. CleanUp³
Models imported from DWG, Revit, or other software arrive in SketchUp full of unnecessary geometry. Duplicate faces, stray edges, repeated materials. CleanUp clears everything automatically. Reduces file size, improves performance, and prevents problems at render time.
Free.
6. Solid Inspector²
Before exporting for 3D printing or any boolean operation, the model needs to be solid. Solid Inspector checks and automatically fixes geometry issues: reversed faces, internal edges, holes. It's the "doctor" for your model.
Free.
7. PlaceMaker
Draw a rectangle on the map and PlaceMaker imports 3D terrain, surrounding buildings, satellite imagery, and elevation data. It does in 2 minutes what would take a full day of manually modeling urban context. For site studies and shadow analysis, it's transformative.
Paid (~$100/year).
8. Skalp
Generates sections and elevations with hatching directly in SketchUp. For those who need technical drawings without leaving the software, Skalp creates sections with material patterns (concrete, earth, insulation) that update automatically when the model changes.
Paid (~$59).
AI plugins for SketchUp: what exists (and what's missing)
9. Redraw: the AI tool that isn't a plugin (and is better than one)
Redraw is not a SketchUp plugin. Nothing needs to be installed. And that's exactly why it works better.
The workflow is simple: take a screenshot of the 3D view in SketchUp, open Redraw in your browser, upload the image, and in 20 to 40 seconds receive a photorealistic render. Works with any version of SketchUp (Free, Go, Pro). No plugin compatibility required. No file weight added. No crashes.
AI plugins like SketchUp AI Render and Veras need to read the 3D geometry of the model, which creates version dependency, compatibility problems, and technical limitations. Redraw skips all of that. It works with the visual image of the model — which is what the AI actually needs.
And the result is superior. Redraw has proprietary models trained for architecture that understand materiality, natural lighting, and proportion. It's not generic AI with an architecture skin. These are models that know the difference between porcelain tile flooring and a wood deck, between sunset light and artificial lighting.
Inside Redraw, beyond the proprietary model, you access ChatGPT optimized for rendering, optimized Gemini, Nano Banana. You can generate project video (proprietary tool + Veo 3 + Kling AI). You can generate 3D objects to import back into SketchUp. You can enhance existing renders with Enhance Render.
It's more than any plugin offers. And easier to use.
Why "not being a plugin" is an advantage
It may seem counterintuitive. If Redraw were a SketchUp plugin, you could click directly from the software. But in practice, plugins create problems:
They depend on the SketchUp version. Update SketchUp and the plugin stops working until an update is released.
They weigh on the model. Render plugins add processing that makes SketchUp slower.
They limit use to one software. If tomorrow you model something in Revit or ArchiCAD, the SketchUp plugin is useless.
Redraw works with any software, on any machine, anywhere. Took a screenshot? Render it. Doesn't matter if it came from SketchUp Free on a Chromebook or SketchUp Pro on a workstation.
The complete SketchUp architect toolkit for 2026
| Function | Tool | Type | Cost |
|---|---|---|---|
| Organic shapes | Curviloft | Free plugin | Free |
| Subdivision | SubD | Paid plugin | ~$39 |
| Custom profiles | Profile Builder | Paid plugin | ~$49 |
| Scatter (vegetation) | Skatter 2 | Paid plugin | ~$69 |
| Model cleanup | CleanUp³ | Free plugin | Free |
| Solid verification | Solid Inspector² | Free plugin | Free |
| Urban context | PlaceMaker | Paid plugin | ~$100/year |
| Sections with hatching | Skalp | Paid plugin | ~$59 |
| AI render + video + 3D | Redraw | Web platform | $15/month |
Frequently asked questions
What is the best AI plugin for SketchUp?
Redraw is not a plugin but delivers superior results: photorealistic render in 30 seconds, nothing to install, with proprietary models trained for architecture.
Does Redraw work with SketchUp Free?
Yes. Since Redraw works with a screenshot of the model, it works with any version of SketchUp, including Free, Go, and Pro. No plugin or specific version required.
Which SketchUp plugins are free?
Curviloft, CleanUp³, and Solid Inspector² are free and essential.
Does Redraw generate 3D objects for SketchUp?
Yes. Redraw has a proprietary 3D object generation model that can be imported directly into SketchUp. Furniture, vegetation, lighting fixtures — any element missing from your library.
Is it worth paying for SketchUp plugins?
It depends on your workflow. SubD, Skatter, and PlaceMaker pay off the investment within a few weeks of use. For rendering, there's no point investing in a paid plugin when Redraw delivers more for $15/month with no installation.
Try Redraw → redraw.pro
Redraw Trends
Featured articles
AI for SketchUp: 10 Plugins and Tools Every Architect Needs in 2026


SketchUp is the most popular modeling software among architects in Brazil and worldwide. Easy to learn, fast to use, and with a plugin ecosystem that lets you do practically anything. But SketchUp alone has limitations. It's through plugins and external tools that it transforms from a "massing software" into a complete professional tool.
In 2026, AI entered this ecosystem with force. And the best part: the most powerful AI tool for SketchUp is not a plugin. It's easier than one. But before we get there, let's cover the essential plugins every architect should know.
Modeling plugins: SketchUp at its best
These plugins solve native SketchUp limitations and give you more control over modeling.
1. Curviloft
SketchUp struggles with organic shapes. Complex curves, flowing roofs, facades with non-linear geometry. Curviloft solves this. It creates surfaces from curves, smooth transitions between different profiles, and shapes that native SketchUp simply cannot produce. For architects designing contemporary buildings with curves, it's indispensable.
Free.
2. SubD (Subdivision Surfaces)
SubD adds subdivision modeling to SketchUp. You create a simple shape (low-poly) and the plugin smooths it in real time, generating complex organic surfaces. The trick is that you work on the simple model (fast and lightweight) and switch to the smoothed version when you need to see the result. Keeps the file light while allowing advanced geometries.
Paid (~$39).
3. Profile Builder
Creates custom profiles (baseboards, moldings, channels, metal profiles) and applies them along any path. Instead of manually modeling each detail, you define the profile once and the plugin extrudes it wherever you need. Saves hours in detailing work.
Paid (~$49).
4. Skatter 2
The most powerful scatter plugin for SketchUp. Vegetation, street furniture, stones, tiles — any object that needs to be repeated at scale. Skatter distributes objects across surfaces with control over density, random rotation, and region exclusion. It turns landscaping and urban scenes that would take hours into minutes.
Paid (~$69).
5. CleanUp³
Models imported from DWG, Revit, or other software arrive in SketchUp full of unnecessary geometry. Duplicate faces, stray edges, repeated materials. CleanUp clears everything automatically. Reduces file size, improves performance, and prevents problems at render time.
Free.
6. Solid Inspector²
Before exporting for 3D printing or any boolean operation, the model needs to be solid. Solid Inspector checks and automatically fixes geometry issues: reversed faces, internal edges, holes. It's the "doctor" for your model.
Free.
7. PlaceMaker
Draw a rectangle on the map and PlaceMaker imports 3D terrain, surrounding buildings, satellite imagery, and elevation data. It does in 2 minutes what would take a full day of manually modeling urban context. For site studies and shadow analysis, it's transformative.
Paid (~$100/year).
8. Skalp
Generates sections and elevations with hatching directly in SketchUp. For those who need technical drawings without leaving the software, Skalp creates sections with material patterns (concrete, earth, insulation) that update automatically when the model changes.
Paid (~$59).
AI plugins for SketchUp: what exists (and what's missing)
9. Redraw: the AI tool that isn't a plugin (and is better than one)
Redraw is not a SketchUp plugin. Nothing needs to be installed. And that's exactly why it works better.
The workflow is simple: take a screenshot of the 3D view in SketchUp, open Redraw in your browser, upload the image, and in 20 to 40 seconds receive a photorealistic render. Works with any version of SketchUp (Free, Go, Pro). No plugin compatibility required. No file weight added. No crashes.
AI plugins like SketchUp AI Render and Veras need to read the 3D geometry of the model, which creates version dependency, compatibility problems, and technical limitations. Redraw skips all of that. It works with the visual image of the model — which is what the AI actually needs.
And the result is superior. Redraw has proprietary models trained for architecture that understand materiality, natural lighting, and proportion. It's not generic AI with an architecture skin. These are models that know the difference between porcelain tile flooring and a wood deck, between sunset light and artificial lighting.
Inside Redraw, beyond the proprietary model, you access ChatGPT optimized for rendering, optimized Gemini, Nano Banana. You can generate project video (proprietary tool + Veo 3 + Kling AI). You can generate 3D objects to import back into SketchUp. You can enhance existing renders with Enhance Render.
It's more than any plugin offers. And easier to use.
Why "not being a plugin" is an advantage
It may seem counterintuitive. If Redraw were a SketchUp plugin, you could click directly from the software. But in practice, plugins create problems:
They depend on the SketchUp version. Update SketchUp and the plugin stops working until an update is released.
They weigh on the model. Render plugins add processing that makes SketchUp slower.
They limit use to one software. If tomorrow you model something in Revit or ArchiCAD, the SketchUp plugin is useless.
Redraw works with any software, on any machine, anywhere. Took a screenshot? Render it. Doesn't matter if it came from SketchUp Free on a Chromebook or SketchUp Pro on a workstation.
The complete SketchUp architect toolkit for 2026
| Function | Tool | Type | Cost |
|---|---|---|---|
| Organic shapes | Curviloft | Free plugin | Free |
| Subdivision | SubD | Paid plugin | ~$39 |
| Custom profiles | Profile Builder | Paid plugin | ~$49 |
| Scatter (vegetation) | Skatter 2 | Paid plugin | ~$69 |
| Model cleanup | CleanUp³ | Free plugin | Free |
| Solid verification | Solid Inspector² | Free plugin | Free |
| Urban context | PlaceMaker | Paid plugin | ~$100/year |
| Sections with hatching | Skalp | Paid plugin | ~$59 |
| AI render + video + 3D | Redraw | Web platform | $15/month |
Frequently asked questions
What is the best AI plugin for SketchUp?
Redraw is not a plugin but delivers superior results: photorealistic render in 30 seconds, nothing to install, with proprietary models trained for architecture.
Does Redraw work with SketchUp Free?
Yes. Since Redraw works with a screenshot of the model, it works with any version of SketchUp, including Free, Go, and Pro. No plugin or specific version required.
Which SketchUp plugins are free?
Curviloft, CleanUp³, and Solid Inspector² are free and essential.
Does Redraw generate 3D objects for SketchUp?
Yes. Redraw has a proprietary 3D object generation model that can be imported directly into SketchUp. Furniture, vegetation, lighting fixtures — any element missing from your library.
Is it worth paying for SketchUp plugins?
It depends on your workflow. SubD, Skatter, and PlaceMaker pay off the investment within a few weeks of use. For rendering, there's no point investing in a paid plugin when Redraw delivers more for $15/month with no installation.
Try Redraw → redraw.pro
AI for Revit: How to Render BIM Projects with Artificial Intelligence in 2026
Revit is the most complete modeling software for architecture. That is not an opinion. It is the global BIM market standard. The amount of information a Revit model carries — precise geometry, assigned materials, construction data, dimensions, quantities — has no equivalent in any other software.
And it is precisely that richness of information that makes Revit excellent for AI rendering.
A well-built 3D model in Revit, when used as a base for AI, delivers superior results compared to SketchUp. The geometry is more precise, materials are already defined in the project, and views are generated with technical accuracy. The AI receives an image with more context, more detail, and consequently produces a better render.
The problem was never Revit. The problem is what comes after.
Revit's bottleneck: rendering
Revit models like nothing else. But rendering inside Revit is painful. The native engine is limited and slow. Most professionals turn to plugins (V-Ray for Revit, Enscape for Revit) or export to other software.
Each of these options adds cost, complexity, and time:
V-Ray for Revit costs $540/yr. It demands powerful hardware and hours of configuration per render. The result is excellent if you master it, but the learning curve is long and time is short.
Enscape for Revit costs $575/yr. It is faster to render but results look generic. Photorealism in materials and lighting is lacking.
Exporting to Lumion or D5 Render adds yet another step (and another license). The file must be exported, imported, reconfigured. Materials are lost in conversion. It is rework.
In the end, the professional who uses Revit spends more time trying to render than modeling. The software that produces the best 3D model on the market is the one that suffers most when it comes to generating images.
Revit + Redraw: the perfect model meets the perfect render
With Redraw, the workflow changes completely. You take a screenshot of the 3D view in Revit and upload it to Redraw. In 20 to 40 seconds, the AI generates a photorealistic render.
No plugin. No export. No material configuration. No waiting 2 hours for a render.
And the result is better than most renders produced with V-Ray or Enscape by professionals who do not have time to configure everything perfectly. Because Redraw's AI was trained to understand architectural context: it identifies materials by appearance, applies realistic natural lighting, and preserves the exact geometry of the model.
If the Revit model is well optimized (and we will cover how to optimize it shortly), the AI render surpasses what SketchUp delivers. Because Revit generates cleaner views, with more defined geometry, and the AI can interpret them with greater precision.
How to optimize your Revit model for AI rendering
Not every screenshot produces an excellent result. The model needs to be presentable. Some practical tips:
Use a realistic 3D view, not wireframe. The AI interprets what it sees. If the view has edge lines, axes, and annotations, the render will reflect that. Enable Realistic or Shaded mode in Revit before taking the screenshot.
Position the camera as you would in a real photo. Eye level (1.50 m to 1.70 m for interiors), natural angle, no excessive distortion. The AI delivers better results when the perspective feels human.
Keep materials assigned. Revit allows you to assign materials to each element. Even if they are not fully renderable materials, the visual information they provide in the 3D view helps the AI interpret what is floor, wall, glass, wood.
Clean up the view. Hide elements that are not part of the scene: piping, exposed structure (if not intentional), grid lines. The cleaner the screenshot, the better the result.
Use full-screen resolution. Take the screenshot at the maximum monitor resolution. More pixels = more information for the AI.
With an optimized model, Revit delivers the best possible base for AI rendering. Better than SketchUp (more precise geometry), better than ArchiCAD (more configurable views), and much better than exports to other software that lose information along the way.
The complete workflow: Revit + Redraw at every project phase
Phase 1: Concept
The project is just beginning. Mass studies, massing, initial site placement. You have a basic Revit model and need to show the client how the project is progressing.
With Redraw, take a screenshot of the massing and generate a quick render. The client sees the project volume with realistic materiality and lighting. In 30 seconds. Without spending hours on a render that will change next week.
Want to explore styles? Use Redraw's idea generation. Brutalist, contemporary, tropical facade. Generate variations in seconds and align direction with the client before developing further.
Phase 2: Design Development
The model is advanced. Materials defined, spaces detailed, lighting considered. Now you need quality renders to validate with the client and make final adjustments.
Screenshot of the Revit 3D view, upload to Redraw, render in 30 seconds. The client asks for wood flooring instead of porcelain tile? Another 30 seconds. Prefers black frames instead of white? Another 30 seconds. In 10 minutes you have generated 15 variations that in the traditional workflow would take 2 days.
Phase 3: Client Presentation
Project approved — time to present with final quality. Facade renders, interiors, aerial perspectives. Material for the commercial proposal, portfolio, and social media.
Render in Redraw at maximum quality. Use Enhance Render to refine details. Generate a project video with Redraw's video tool (proprietary model, Veo 3, or Kling AI). Generate 3D objects missing from the model and import them into SketchUp/Revit.
Complete deliverable. One platform. One subscription.
Frequently Asked Questions
Do I need a plugin to use AI with Revit?
No. Redraw works through the browser. You take a screenshot of the Revit 3D view and upload it to the platform. No plugin to install, no file to export, no integration required.
Is a Revit model good for AI rendering?
Excellent. Revit generates precise geometry with assigned materials. When well optimized, a Revit screenshot delivers superior results to SketchUp for Revit AI rendering, because the AI receives more context and more detail.
Does Redraw replace V-Ray for Revit?
For the vast majority of everyday renders (presentations, variations, portfolio), yes. V-Ray retains an advantage only in scenarios requiring absolute control of every parameter. For everything else, Redraw is faster, cheaper, and the result is professional.
Can I render Revit sections and floor plans with AI?
Yes. Redraw accepts any image. If you generate a humanized section view or floor plan in Revit and upload it to Redraw, the AI can humanize and stylize it. Redraw has presets for humanized floor plans and architectural sections.
Does Revit run on Mac?
Not natively. Revit is Windows only. But BIM rendering AI with Redraw works on any system. You can model on Windows with Revit and render on Mac, tablet, or mobile through Redraw.
Try Redraw → redraw.pro
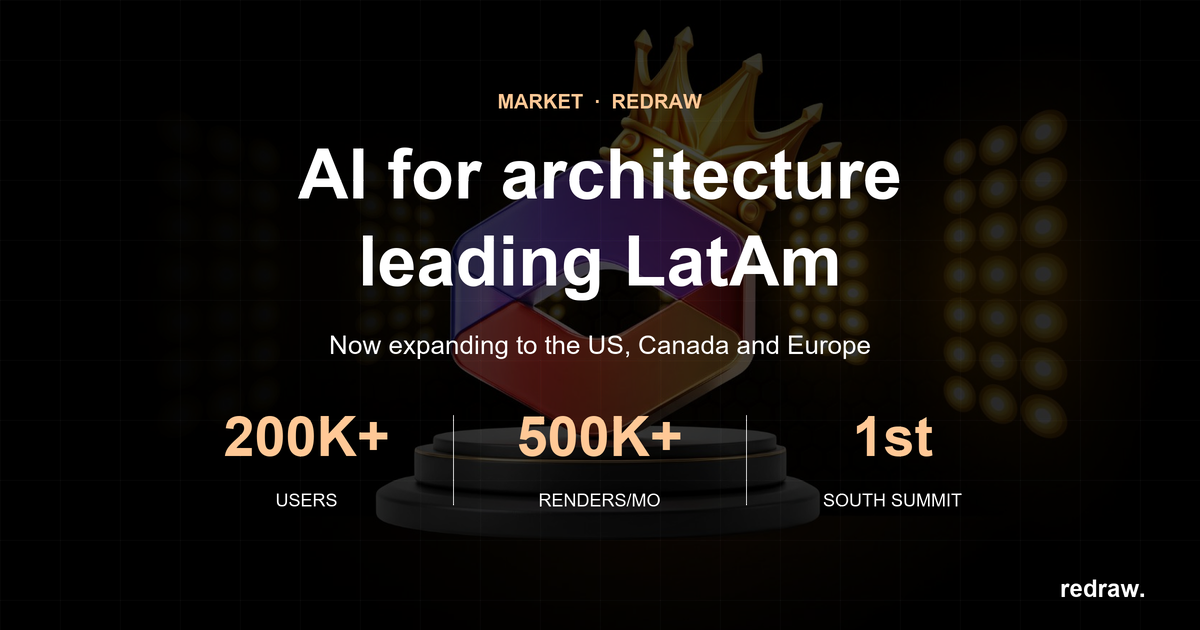
The AI for Architecture Leading Latin America Now Expanding to the US and Europe
Latin America is producing the world's largest AI rendering revolution. And Brazil is leading it.
While American and European companies try to adapt generic AIs to architecture, a Brazilian startup built from scratch the largest AI platform specialized in rendering for architects, engineers, and interior designers on the planet. With more than 200,000 registered users, over 500,000 renders generated per month, and a presence in dozens of countries.
The name is Redraw. If you work with architecture in Latin America — or anywhere in the world — and don't know it yet, this article explains why you should.
The numbers that position Redraw as the best AI rendering platform for architecture in Latin America
200,000 registered professionals. The majority are in Brazil, with accelerating expansion to Mexico, Colombia, Argentina, Chile, Peru, and English-speaking markets (US, Canada, Europe).
More than 500,000 renders per month. That is more than any other AI platform focused on architecture in the world produces. And the volume grows every month.
Platform in 3 languages. Portuguese, English, and Spanish. Native websites, support, and content in each language. Not automatic translation. Local operation.
Team of AI specialists. Proprietary models trained exclusively for architecture, engineering, and interior design. Constantly updated. Results that, in benchmarks, surpass any generic AI in project fidelity.

South Summit 2026: global recognition
In March 2026, Redraw won South Summit in Porto Alegre in the Digital and Tech Solutions category. South Summit is one of the largest global platforms connecting startups, investors, and major corporations. The Brazilian edition had more than 23,000 participants, around 3,000 startups registered, and 130 investment funds.
More than 2,000 companies entered globally. Only 50 reached the final, split across 5 categories. Redraw took the prize.
This recognition is not just a trophy. It is validation that the problem Redraw solves — accessible, fast, and faithful rendering for project professionals — has global relevance. And that the solution came from Latin America.
Why no competitor dominates Latin America
Redraw's main global competitors are American, European, and Chinese companies: Veras (Chaos Group, based in Bulgaria/US), LookX (China), Rendair (Turkey), ArchiVinci (US). None of them have a strong presence in Portuguese or Spanish.
They have no PT-BR support. They do not understand the particularities of the Latin American market. They do not know that here, the professional often works alone, with a laptop, without a hardware budget, and needs to deliver fast because the client asked yesterday.
Redraw was born in that context. Built by people who understand the reality of Brazilian and Latin American architects. And that shows in everything: accessible price (from US$15/month), 100% cloud platform (works on any machine), support in Portuguese and Spanish, and educational content in all 3 languages.
While competitors charge US$30 to US$60/month for generic results, Redraw delivers more for less. Because it was built for this market.
The global expansion that starts from Brazil
Redraw started in Brazil and is expanding to the world: US, Canada, Europe, Middle East. International traction grows every month, driven by the quality of proprietary models and the recognition from South Summit 2026.
But the core remains Latin America. This is where the 200,000 professionals who validated the platform are. This is where daily feedback shapes every update. Redraw is not an American company trying to translate a product for Brazil. It is a Brazilian company taking the best AI for architecture to the world.
That matters. Because when a Latin American professional needs support, they speak with someone who understands the context. When they suggest a feature, it is considered. When they complain, they are heard. Not "ticket #47832 with a response in 72 hours in English."
Warning: beware of the generic AIs flooding the market
With the growth of the AI for architecture market, a serious problem has emerged: dozens of new tools that charge high prices for results that are not worth it.
What these tools do: they take the ChatGPT or Gemini API, put an interface on top, add an "AI for architecture" label, and charge $10 per 10 renders — $1 per image generated by an AI anyone can access directly through ChatGPT for free.
They have no proprietary model. They do not invest in architecture-specific training. They have no AI team. They are intermediaries reselling generic API with absurd markup.
The result is predictable: generic images that do not maintain project fidelity, without consistency, without control. The professional pays a lot, gets a bad result, and concludes that "AI for architecture doesn't work." It does work. It just doesn't work with an API reseller.
How to identify these tools:
Ask if the platform has proprietary models trained for architecture. If the answer is vague or they say they "use the best models on the market" without specifying which ones are theirs, it is API resale.
Look at the price per render. If they charge $1+ per image, that is exploitation. Redraw delivers 300 renders for US$15/month (less than $0.05 per render).
Test with your real project. If the AI changes geometry, invents windows, and alters proportions, the underlying model is generic. The packaging does not matter.
What Redraw delivers that generic platforms cannot
Proprietary models. Trained with millions of real images from architecture, engineering, and interior design projects. Not ChatGPT with a skin. Proprietary AI that understands architectural projects.
Optimized AI hub. ChatGPT, Gemini, and Nano Banana inside Redraw, all prepared by the team to deliver superior results for architecture. The ChatGPT inside Redraw is not the same ChatGPT you use on OpenAI's website.
Complete ecosystem. Photorealistic render in 30 seconds. Enhance Render. Video generation with a proprietary tool + Veo 3 + Kling AI. 3D object generation for SketchUp. Everything in one platform, for one subscription.
Fair price. From US$15/month with ~300 renders. Free trial with 10 credits, no credit card. No tricks, no credits that expire in 24 hours.
Real support. In Portuguese and Spanish. WhatsApp, email, live chat. People who understand architecture responding, not a generic bot.
Frequently asked questions
What is the best AI for architecture in Latin America?
Redraw is the largest AI platform for architecture in Latin America, with over 200,000 users and 500,000 monthly renders. It serves professionals in Brazil, Mexico, Argentina, Chile, Colombia, Peru, the US, and Europe. Winner of South Summit 2026 in the Digital and Tech Solutions category.
Is Redraw a Brazilian company?
Yes. Founded in Brazil, operating in Portuguese, English, and Spanish. The development, AI, and support team operates from Brazil, with international expansion. The company is headquartered in the United States.
Are generic AI tools for architecture a scam?
Not all, but many charge excessive prices ($1+ per render) to resell the ChatGPT or Gemini API without any proprietary training. Before subscribing, verify whether the platform has proprietary models trained specifically for architecture.
Does Redraw work in other countries in Latin America?
Yes. The platform is available in Portuguese, English, and Spanish, with an active presence in Mexico, the United States, Canada, Colombia, Argentina, Chile, Peru, and other countries. Support is available in all languages.
How much does Redraw cost?
From US$15/month with ~300 renders. Free trial with 10 credits, no credit card required. It is the AI architecture platform with the best value for money in Latin America — and increasingly competitive globally.
Try Redraw → redraw.pro
cadastre-se
Exclusive content directly in your email


Redraw vs Twinmotion: Why Architects Are Trading Heavy Rendering for AI in 2026
Twinmotion arrived with a pitch similar to Lumion, D5 Render, and Enscape: ease and speed for rendering. Less complexity than V-Ray, fast results, visual interface. And being from Epic Games (same engine as Unreal), it had the technical potential to deliver serious quality.
But in practice, Twinmotion brought along the problems of any Unreal Engine-based software: heavy, hardware-hungry, and with the crashes anyone who uses it knows well. And the learning curve, which was supposed to be simple, ended up steeper than Lumion's.
In 2026, the scenario is different. Architects no longer have time to burn hours on complex render software. Those using AI deliver 20 images per day. Those stuck on traditional software spend days on a single image.
Twinmotion: what works and what doesn't
Twinmotion is a real-time rendering software developed by Epic Games. It runs on top of Unreal Engine, which technically means access to one of the most powerful graphics engines on the market.
In theory, beautiful. In practice, Unreal Engine is heavy. To run Twinmotion smoothly, you need a high-performance GPU (RTX 3070 at minimum), 32 GB of RAM, and a fast SSD. A suitable machine costs between $2,000 and $5,000. And even then, complex scenes crash. Anyone working on larger projects — housing developments, commercial buildings, masterplans — knows Twinmotion chokes.
The software price itself is more accessible than Lumion: free for professionals with revenue below $1 million per year. Above that, the license costs $445/year. Sounds good, until you add the hardware required to run it.
The learning curve is another point. Twinmotion isn't as intuitive as it seems. Importing SketchUp or Revit models, configuring materials properly, adjusting vegetation, solving scale issues. Hours of adjustment before reaching a usable result. And the results, although good, still have that "game engine render" look. Too clean, lacking natural realism.
The real problem: time
Time is where Twinmotion loses badly. I'm not just talking about render time (which is actually fast in preview). I'm talking about total time: opening the software, importing the model, fixing import bugs, configuring materials, adjusting camera, placing vegetation and people, rendering, realizing it looks off, adjusting, rendering again.
This cycle consumes hours. For each image. And every time the client asks for a change, back to square one.
Conventional rendering software had its time and moment. But the truth is that those not using the AI available today are falling behind. While one architect renders and delivers 20 images per day with AI, another is stuck on adjustments for days.
It's not a matter of preference. It's productivity.
How Redraw works differently
With Redraw, the render flow takes minutes, not hours. No learning curve. You upload a clean screenshot from your SketchUp, ArchiCAD, or Revit and the AI delivers the render. Faithful to the project and with professional quality.
Need a change? 30 seconds. Another finish variation? 30 seconds. Night version? 30 seconds. Five different angles? Less than 3 minutes for the entire batch.
Redraw doesn't need a powerful GPU. Doesn't need Unreal Engine running underneath. Doesn't need 32 GB of RAM. It works in the browser, on any machine, anywhere. Entry-level notebook, Mac, even phone.
And unlike generic AIs like ChatGPT or ComfyUI, Redraw was trained for architecture. It doesn't invent the project. It renders what you designed, preserving geometry, proportions, and materials.
Comparison: Twinmotion vs Redraw
Speed: Twinmotion takes 30 minutes to several hours per image. Redraw delivers renders in 30 seconds to 2 minutes.
Hardware: Twinmotion requires a powerful machine (GPU RTX 3070+, 32GB RAM, SSD). Redraw runs in the browser, with no specific hardware requirements.
Total cost: Twinmotion is free up to $1M revenue, but the hardware costs $2,000-$5,000. Redraw plans start at $19/month, no hardware investment.
Learning curve: Twinmotion requires hours of initial setup and days to master. Redraw works in minutes from first use.
Creative control: Twinmotion gives full control over every scene element. Redraw focuses on speed and render volume, with control via prompts.
Offline use: Twinmotion works offline. Redraw requires internet connection.
When to use each tool
Twinmotion still makes sense for those who need full control over the scene, work on projects requiring complex animations, or already have the necessary hardware and don't want to change workflow.
Redraw makes sense for those who need volume of fast renders, are tired of crashing in heavy software, or want to produce more images without investing in hardware.
For most architects and interior designers who need efficiency and volume, Redraw offers a more practical proposition in 2026.
How to start with Redraw
Visit redraw.pro, create a free account and make your first render in less than 5 minutes. No credit card required to test.
How to Render with ChatGPT: Why Architects Are Using It Inside Redraw

ChatGPT generates incredible images. That's a fact. Ever since GPT-4o gained native image generation, architects worldwide started testing it. And the results impress at first glance. Beautiful spaces, dramatic lighting, materials that look real.
Until you compare it with the project you actually designed.
Because ChatGPT wasn't built for architects. It generates beautiful images, but it doesn't generate your project. It invents windows that don't exist, changes proportions, swaps materials, and adds elements you never asked for. And if you try to fix it via prompt, you enter a trial-and-error cycle that can last hours.
The right question isn't "does ChatGPT render?". It does. The question is: does it render what you designed?
The problem with using ChatGPT directly
When you use ChatGPT directly to generate an architecture render, you're asking a generic AI to do specialized work. It's like asking a general practitioner to perform surgery. They understand medicine, but that's not what they do.
In practice, this means:
You have to write long, specific prompts trying to describe every detail of your project. Even then, the result comes out different from what you imagined. ChatGPT has no sense of architectural scale. It doesn't understand that a door is 2.10m, that a double-height ceiling changes the proportion of the entire space, or that the finish is porcelain tile and not marble.
And worse: every time you generate a new image, the result is completely different. There's no consistency. You ask for 5 versions of the same space and get 5 different projects. For anyone who needs to present finish variations to a client, this doesn't work.
If you want to dive deeper into why prompts get complicated in ChatGPT and simplified in Redraw, check this comparison we published: Render prompts: why ChatGPT complicates and Redraw simplifies.
ChatGPT inside Redraw: the difference
What many people don't know is that you can use ChatGPT inside Redraw. Not generic ChatGPT. A version tuned for architecture.
Redraw developed studies and adjustments to turn ChatGPT into a deep tool for architectural rendering. When you use ChatGPT inside Redraw, it understands project context: it can tell a residential interior from a commercial one, recognizes materials, respects proportions.
It's the same engine, but directed. Like the difference between a generic GPS and Waze: same underlying technology, completely different result because one knows the context.
But it doesn't stop there. Inside Redraw, you also access Nano Banana and other AI models. Want to compare results between ChatGPT and Nano Banana for the same project? Do it on the same platform, without switching tools, without paying separate subscriptions.
That's the point: Redraw centralizes the best AIs in one place, all adapted for architecture. Instead of paying for ChatGPT Plus, subscribing to Nano Banana, and still not getting professional results, you pay one subscription and get access to everything.
Comparison: ChatGPT direct vs ChatGPT in Redraw vs native Redraw
| Criterion | ChatGPT (direct) | ChatGPT inside Redraw | Redraw (own model) |
|---|---|---|---|
| Focus | Generalist (does everything) | Tuned for architecture | Trained for architecture |
| Project fidelity | Low (invents elements) | Medium-high (directed context) | High (respects original geometry) |
| Prompt required | Long and detailed | Simplified | Minimal or none |
| Consistency across renders | Low (every image differs) | Medium | High (controlled variations) |
| Material quality | Generic | Good | Photorealistic |
| Lighting | Impressive but artificial | Natural | Trained for architectural light |
| Cost | US$ 20/month (ChatGPT Plus) | Included in Redraw plan | From US$ 15/month |
| Other AIs included | No | Yes (Nano Banana and others) | Yes |
What Redraw does that ChatGPT can't
The Redraw rendering model was trained specifically to be better than ChatGPT for architecture. It's not an opinion, it's the result of the training: millions of real project images, with real geometry, materials, and lighting.
When you upload a SketchUp screenshot to Redraw, it understands what it's looking at. You don't need to describe "living room with porcelain floor, gray sofa, floor-to-ceiling window with natural light coming from the left". It sees the model and renders it while keeping everything in place.
With ChatGPT, even with a perfect prompt, the AI will interpret your description and generate something new. It might look good. But it won't be your project.
If you want to go deeper into how to create efficient prompts for interior renders, there's a complete guide here: Complete guide to prompts for interior renders with AI.
For those who use ChatGPT today
If you already use ChatGPT to generate visual references, brainstorm facades, or explore styles, keep doing it. It's good at that. Generating ideas, exploring concepts, creating visual moodboards. For that, ChatGPT is excellent.
But when it's time to render your actual project, with fidelity, consistency, and professional quality, use Redraw. You can even use ChatGPT inside it to get the best of both worlds.
The logic is: ChatGPT to explore. Redraw to deliver.
Frequently Asked Questions
Does ChatGPT render architecture projects?
Yes, ChatGPT generates architecture images, but it creates generic images based on text descriptions — it doesn't render your specific project. It doesn't read 3D files and doesn't keep fidelity to the original geometry. Redraw solves this: you upload a 3D model screenshot and in 20 to 40 seconds you get a photorealistic render that respects windows, proportions, and materials from your original project, without inventing elements.
Can I use ChatGPT inside Redraw?
Yes. Redraw integrates ChatGPT in a version tuned for architecture, with better understanding of materials, lighting, and project context. The result is superior to ChatGPT used directly because the system already directs the prompt and injects architectural context, eliminating long prompts and the trial-and-error cycle typical of generic ChatGPT.
ChatGPT Plus or Redraw: which is more worth it for architects?
ChatGPT Plus costs US$ 20/month and is generic. Redraw starts at US$ 15/month, is specialized in architecture, and includes tuned ChatGPT plus other models like Nano Banana in the same subscription. For project rendering, Redraw delivers more for less: a single subscription replaces ChatGPT Plus, render plugins, and hours of monthly setup.
Does Redraw need a prompt to render?
For Redraw's native rendering model, no. You upload the 3D model image and it generates automatically in 20 to 40 seconds. To use ChatGPT inside Redraw, the prompt is simplified because the system already directs the architectural context, so a short sentence delivers what generic ChatGPT would require paragraphs of technical description for.
Is Nano Banana inside Redraw?
Yes. Redraw works as an AI hub: you access tuned ChatGPT, Nano Banana, and other models on the same platform, without separate subscriptions. This lets you compare results between models for the same project and choose what delivers best for each type of render — interior, facade, humanized floor plan — without switching tools.
Why does ChatGPT invent elements in architecture renders?
ChatGPT generates images from text and learned patterns, not from your project's geometry. It fills gaps with what statistically looks like "beautiful architecture", even if that means inventing windows or swapping materials. Redraw works differently: it reads your 3D model screenshot as faithful reference and renders while preserving the geometry, openings, and original proportions of the project.
Try Redraw → redraw.pro
Redraw vs Enscape: Comparison for Architects 2026
Enscape has an interesting proposition: real-time rendering, directly inside your modeling software. No waiting hours. No leaving SketchUp or Revit. Click, render. Sounds ideal.
And for a long time it was the best option for those who needed speed without the complexity of V-Ray or Corona. Chaos Group understood this and bought Enscape for exactly that reason. It was supposed to be the fast version of their ecosystem.
But speed without realism solves half the problem. And that's the central question for Enscape in 2026.
The problem no one talks about with Enscape
Enscape renders fast. No one argues with that. But try to deliver an interior render with convincing natural lighting, realistic floor reflections and textures that don't look plastic. You'll spend hours adjusting, testing, redoing. And most of the time, the final result still looks like "software render". It lacks the realism the client expects when seeing a project image.
It's not the user's fault. It's engine limitation. Enscape was designed to be fast, not to compete in quality with V-Ray. Real-time rendering sacrifices complex calculations of global illumination, caustics and light bounce. The result is clean, fast, but generic.
And even being "fast" at rendering, setup isn't. You still need to configure materials one by one, adjust textures, position lighting. Rendering itself takes seconds, but preparation takes hours. And that's where frustration kicks in: you spend all this time and the result doesn't reach where you wanted.
Enscape is a plugin (and that matters)
Enscape runs inside SketchUp, Revit or ArchiCAD. It doesn't work alone. You pay the Enscape license plus the host software license.
Enscape Solo costs $575/year. Enscape Premium goes for $635/year. Add SketchUp Pro ($349/year) or a Revit license, and annual cost easily exceeds $900. For a 3-person office, multiply by 3.
And you're locked into those software. If you switch from SketchUp to Blender, you lose Enscape. If you want to render a quick image outside the office, without the PC with the software installed, you can't.
How Redraw solves what Enscape can't
There are two scenarios here.
Scenario 1: Enscape + Redraw (complement)
You like Enscape, use it daily, don't want to change your workflow. Fine. Redraw comes in as the missing layer.
Rendered with Enscape and got the "software render" look? Drop it into Redraw's Enhance Render. In 30 seconds, AI improves textures, fixes lighting, adds natural reflections and delivers that photorealism Enscape alone can't reach. That's exactly what the feature was built for: take what conventional software delivers and elevate it to another level.
The combo works well. Enscape provides real-time preview speed, Redraw provides the final finish.
Scenario 2: Redraw alone (replacement)
If what you want is the final result, without worrying about hours of setup, Redraw does everything alone. Take a screenshot of your 3D model, upload to the platform, and in 20 to 40 seconds you have a photorealistic render. No material configuration, no light adjustment, no plugin.
And with quality superior to what Enscape delivers alone. Because Redraw's AI was trained specifically for architecture. It understands how natural light behaves in interiors, how materials reflect, how vegetation creates shadows. Things that in Enscape you try to configure manually and rarely get right the first time.
Comparison: Enscape vs Redraw
| Criteria | Enscape | Redraw |
|---|---|---|
| Render time | Near instant (but setup takes hours) | 20 to 40 seconds (no setup) |
| Result quality | Good but generic. Lacks photorealism | Photorealistic (AI trained for architecture) |
| Hardware required | Dedicated GPU, powerful PC | Any PC with internet |
| Annual cost | ~$575 + host (SketchUp/Revit) | From $180/year |
| Runs alone? | No (plugin for SketchUp/Revit/ArchiCAD) | Yes, directly in browser |
| Per-render setup | Manual: materials, light, camera | Automatic: AI identifies everything |
| Remote access | No | Yes, 100% cloud |
| Quick variations | Instant preview but requires manual adjustments | 30 sec per variation |
| Lighting realism | Limited (real-time sacrifices GI) | High (AI simulates natural lighting) |
The math
For a freelance architect who delivers 30 renders per month:
With Enscape:
Enscape Solo license: $575/year
SketchUp Pro license: $349/year
Proper hardware: ~$2,000/year (amortized)
Setup time per render: ~40 minutes (total: ~20 hours/month)
Total: ~$2,924/year + 20 hours/month of setup
With Redraw:
Basic plan: $180/year
Hardware: the laptop you already have
Total time: ~15 minutes/month
Total: $180/year + 15 minutes
Savings of $2,744/year and 20 monthly hours. And with better final result.
For those deciding now
If you haven't invested in Enscape yet, test Redraw first. Free account at redraw.pro, no credit card. Make your first renders and compare.
If you already use Enscape and like the workflow, add Redraw as complement. Enhance Render transforms your Enscape renders into results only V-Ray previously delivered.
And if you're tired of spending hours configuring materials for results that don't reach where you want, Redraw alone solves it. In seconds. In browser. No installation.
Frequently Asked Questions
Does Enscape have photorealistic rendering compared to Redraw?
Enscape delivers good and fast results, but the real-time engine limits photorealism level. Global illumination, complex reflections and texture quality fall below engines like V-Ray. Redraw fills that gap with AI trained specifically for architecture, delivering photorealism in 30 seconds without configuring materials one by one. It's the difference between "software render" and a photo that looks real.
Can I enhance my Enscape renders with AI?
Yes. Redraw's Enhance Render feature was built exactly for that. Upload the render that came out of Enscape and in 30 seconds receive a version with enhanced textures, lighting and reflections. It's the fastest path for those who already use Enscape and want a photorealistic final finish without migrating software or re-rendering the entire scene.
Does Enscape work alone or does it need other software?
Enscape is a plugin and doesn't work alone. It requires an active SketchUp, Revit, Rhino or ArchiCAD license to run, adding two subscriptions to the budget. Redraw is a standalone platform that runs directly in the browser, no installation and no host software dependency, with total cost from $180/year against $924/year for Enscape + SketchUp.
Which is faster in the full workflow: Enscape or Redraw?
Enscape renders in real time, but total production time includes 30 to 60 minutes of configuration per scene: materials, light, camera. Redraw delivers the final result in 20 to 40 seconds from a 3D model screenshot, without any configuration. In the full workflow, considering an architect who delivers 30 renders per month, Redraw returns 20 monthly hours compared to Enscape workflow.
Is Enscape from the same company as V-Ray?
Yes. Chaos Group bought Enscape to have a faster option in the portfolio. But even within the Chaos ecosystem, Enscape doesn't compete in quality with V-Ray or Corona. Redraw solves this trade-off delivering Enscape speed and quality superior to V-Ray in a single cloud AI platform, without need for plugin or host software.
What is the best Enscape alternative in 2026 for architects?
The best Enscape alternative in 2026 is Redraw, AI platform trained specifically for architecture, engineering and interior design, with workflow that dispenses mandatory SketchUp or Revit. Redraw delivers photorealism in 30 seconds against Enscape's generic rendering, with savings of more than $2,700/year and 20 monthly hours of productivity returned.
Try Redraw → redraw.pro
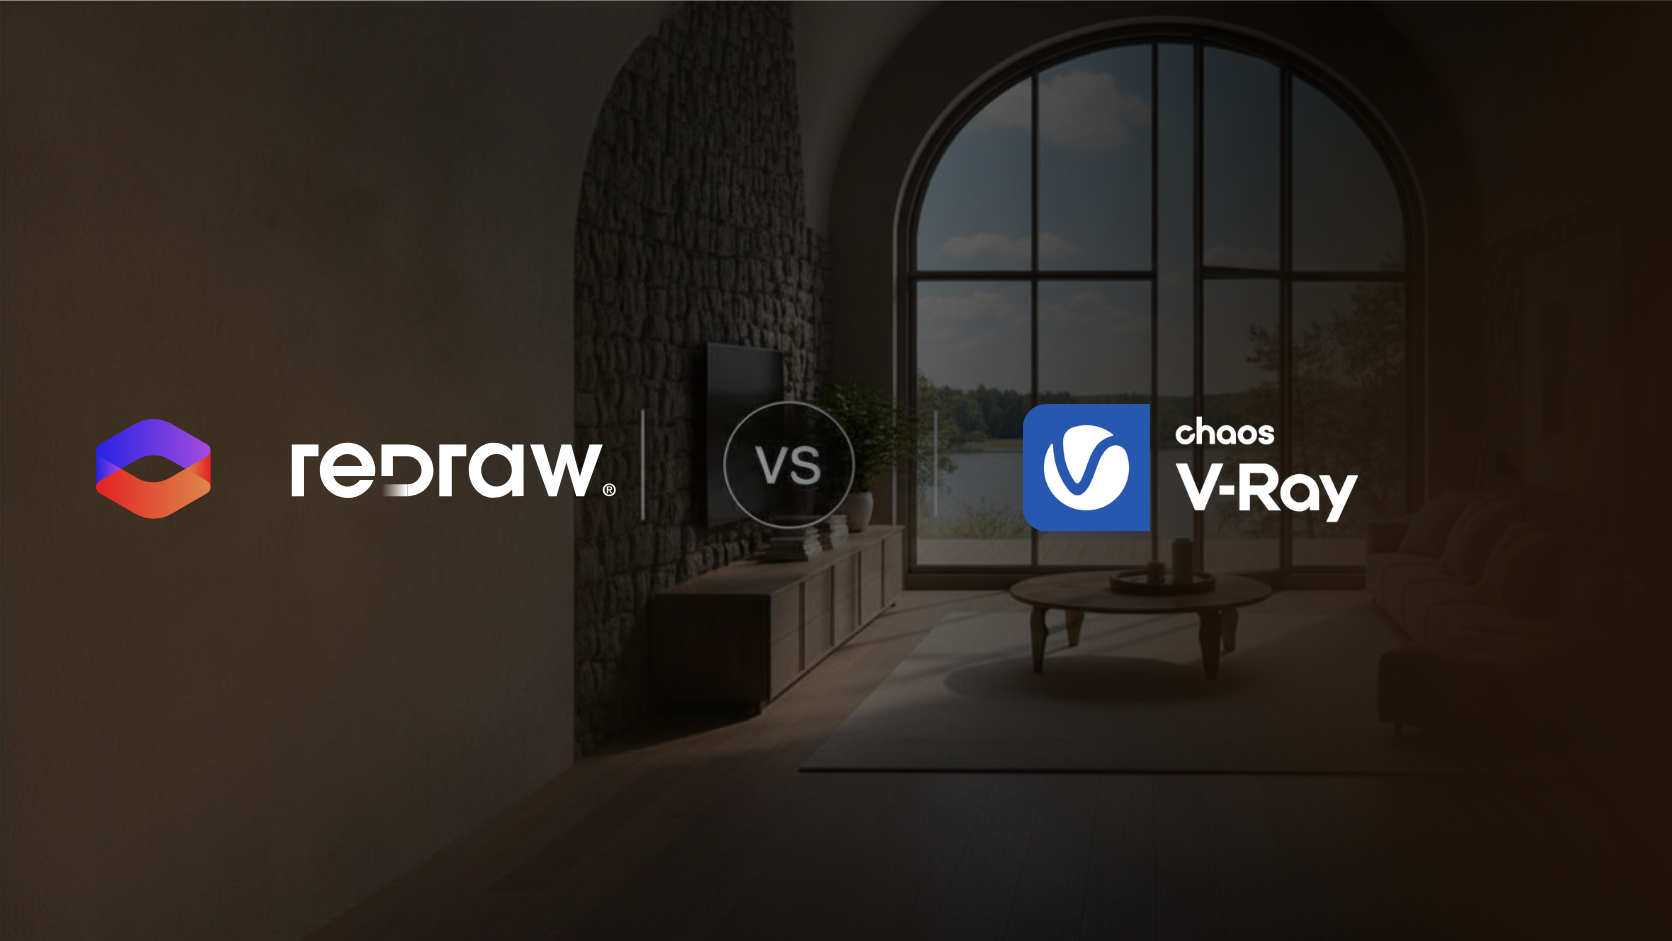
Redraw vs V-Ray: Comparison for Architects 2026
V-Ray dominated rendering for years. Together with Corona Render, they were the only options for hyper-realistic results. No other render engine came close. Architects working on high-end projects, competitions or commercial visualization had no choice: it was V-Ray or V-Ray.
But all of that had a price. And I'm not just talking about the license.
The V-Ray reign (and its real cost)
To master V-Ray, a professional needed years of study. There are more than 1,000 parameters that, combined correctly, deliver the level of photorealism everyone recognizes. Materials, global illumination, caustics, GI, sampling. Each render is an engineering project.
Render time has also always been a problem. A V-Ray render can take 1 to 8 hours depending on scene, resolution and hardware. That's 3x longer than software like Lumion or Enscape. And during that time, your computer is locked.
Speaking of hardware: to run V-Ray with quality, you need a serious machine. Powerful multi-core CPU, 32 GB+ RAM, dedicated GPU. A proper setup costs between $2,000 and $6,000 USD.
V-Ray Solo license costs $540/year. It looks "ok" until you add that V-Ray is a plugin. It doesn't run alone. It needs SketchUp, 3DS Max, Rhino or Revit underneath. So you pay the V-Ray license plus the host software license. Two subscriptions.
Chaos Group itself realized this model was losing ground. Simpler software like Lumion and Twinmotion were stealing market share, even delivering inferior results. Their answer? They bought Enscape. They tried to apply Chaos technology to something faster. They acknowledged the problem without saying it out loud.
AI changed what "rendering" means
The turning point happened when AI tools started delivering satisfactory results in seconds. Redraw was a pioneer in this movement: rendering with AI trained specifically for architecture.
At first, AI quality didn't come close to V-Ray. That's true. But it evolved fast. Today, results are hyper-realistic and keep fidelity to the original project. Proportions, geometry, materials. The AI doesn't invent. It renders what you designed.
And it does it in 20 to 40 seconds. No setup. No expensive hardware. No years-long learning curve.
The work that took a week between modeling, setting up materials, adjusting lighting and rendering, today is done in less than 10 minutes with AI. It's not exaggeration. It's the real workflow of those using it.
Comparison: V-Ray vs Redraw
| Criteria | V-Ray | Redraw |
|---|---|---|
| Render time | 1 to 8 hours | 20 to 40 seconds |
| Hardware required | Powerful CPU, 32 GB+ RAM, dedicated GPU | Any PC with internet |
| Annual cost | ~$540 + host license | From $180/year |
| Hardware cost | $2,000 to $6,000 | Zero (runs in browser) |
| Learning curve | High (1,000+ parameters) | Very low (upload + generate) |
| Per-render setup | Manual | Automatic via AI |
| Runs on laptop? | Only workstation | Yes, any laptop |
| Remote access | No | Yes, 100% cloud |
| Project fidelity | High (manual config) | High (AI for architecture) |
The math no one does
Take an architect who delivers 8 projects per month, with 4 renders each. With V-Ray, each render takes an average 2 hours counting setup and processing. That's 64 hours per month just rendering.
With Redraw, the same 32 renders take less than 20 minutes total. That's 63 hours returned per month.
V-Ray: $540/year (V-Ray) + $349/year (SketchUp) + amortized hardware (~$3,000/year) = ~$3,889/year
Redraw: $384/year (Expert plan) + zero hardware = $384/year
Difference: more than $3,500 per year. And 63 hours per month.
For those still using V-Ray
If you invested years learning V-Ray and have projects that demand absolute control of every parameter, no one is saying to throw it away. For animations of extreme complexity or projects where every sub-surface scattering detail matters, V-Ray still has space.
But honest question: how many of your projects really need that level? In most offices, 90% of renders are for client presentation, facade study, interior variations. You don't need 8 hours of rendering for that.
And even when you use V-Ray, Redraw works as a complement. Rendered with V-Ray? Drop it into Redraw's Enhance Render. In 30 seconds, textures and lighting reach another level without re-rendering.
Frequently Asked Questions
Does Redraw replace V-Ray for architecture projects?
For the vast majority of day-to-day projects, yes. Redraw delivers photorealistic renders in 20 to 40 seconds versus 1 to 8 hours with V-Ray, without requiring powerful hardware or host software license. V-Ray retains relevance in niches that demand extreme technical control, such as complex animations, sub-surface scattering and cinema visualizations. For presentations, portfolios and residential and commercial project deliveries, Redraw delivers professional results in seconds.
How much does V-Ray cost per year compared to Redraw?
V-Ray Solo license costs $540/year, not counting mandatory host software (SketchUp Pro at $349/year, or 3DS Max at $2,820/year) and required hardware ($2,000 to $6,000 amortized). Total annual cost of a V-Ray setup easily exceeds $3,800/year. Redraw starts at $15/month ($180/year), runs in the browser without dedicated hardware and dispenses with any host software. Annual savings exceed $3,500 per workstation.
Can I enhance my V-Ray renders using Redraw?
Yes. Redraw's Enhance Render feature accepts images from any software, including V-Ray, Corona, Lumion and Enscape. You upload the existing render and in about 30 seconds receive a version with enhanced textures, lighting and sharpness, without re-rendering the scene. It's the fastest path for those with V-Ray pipeline investment who want speed on material, lighting and ambient variations.
Does V-Ray work alone or does it need other software?
V-Ray is a plugin and doesn't work alone. It requires an active SketchUp, 3DS Max, Rhino or Revit license to run, adding two subscriptions to the budget. Redraw, on the other hand, is a standalone platform that runs directly in the browser, no installation and no host software dependency, which drastically reduces total cost and setup time for solo architects and 1-to-10 person studios.
What is the best V-Ray alternative in 2026 for architects?
The best V-Ray alternative in 2026 is Redraw, an AI platform trained specifically on architecture, engineering and interior design, with native integration with SketchUp, Revit and Archicad workflows. Redraw delivers photorealistic renders in 30 seconds instead of 1 to 8 hours, without powerful hardware or host software license, and is the path most solo offices and small studios are adopting to scale deliveries.
Is Redraw quality comparable to V-Ray for the end client?
Yes. The latest Redraw generations produce images indistinguishable from V-Ray renders for the vast majority of cases: residential, commercial, hospitality, retail and high-end interiors. The end client decides by emotion before reason, and what matters is the visual narrative of light, texture and ambient, all delivered in seconds by Redraw. V-Ray renders are reserved only for architectural competitions, real estate catalogs and animations of extreme technical demand.
Try Redraw → redraw.pro
Redraw vs Enscape: Comparativo para Arquitetos 2026
O Enscape tem uma proposta interessante: render em tempo real, direto dentro do seu software de modelagem. Sem esperar horas. Sem sair do SketchUp ou Revit. Clicou, renderizou. Parece ideal.
E por muito tempo foi a melhor opção pra quem precisava de velocidade sem a complexidade do V-Ray ou Corona. A Chaos Group entendeu isso e comprou o Enscape exatamente por essa razão. Era pra ser a versão rápida do ecossistema deles.
Só que velocidade sem realismo resolve metade do problema. E essa é a questão central do Enscape em 2026.
O problema que ninguém fala sobre o Enscape
O Enscape renderiza rápido. Isso ninguém discute. Mas tenta entregar um render de interior com iluminação natural convincente, reflexos realistas nos pisos e texturas que não pareçam plástico. Vai gastar horas ajustando, testando, refazendo. E na maioria das vezes, o resultado final ainda fica com cara de "render de software". Falta aquele realismo que o cliente espera quando vê uma imagem de projeto.
Não é culpa de quem usa. É limitação do motor. O Enscape foi feito para ser rápido, não para competir em qualidade com V-Ray. A renderização em tempo real sacrifica cálculos complexos de iluminação global, caustics e bounce de luz. O resultado é limpo, é rápido, mas é genérico.
E mesmo sendo "rápido" no render, o setup não é. Você ainda precisa configurar materiais um por um, ajustar texturas, posicionar iluminação. A renderização em si leva segundos, mas a preparação leva horas. E aí entra a frustração: você gasta esse tempo todo e o resultado não chega onde você queria.
Enscape é um plugin (e isso importa)
O Enscape roda dentro do SketchUp, Revit ou ArchiCAD. Não funciona sozinho. Você paga a licença do Enscape mais a licença do software host.
Enscape Solo custa US$ 575/ano. Enscape Premium sai por US$ 635/ano. Some o SketchUp Pro (US$ 349/ano) ou uma licença Revit, e o custo anual passa de US$ 900 facilmente. Para um escritório com 3 pessoas, multiplica por 3.
E fica preso àqueles softwares. Se muda de SketchUp pra Blender, perde o Enscape. Se quer renderizar uma imagem rápida fora do escritório, sem o PC com o software instalado, não dá.
Como o Redraw resolve o que o Enscape não consegue
Aqui tem dois cenários.
Cenário 1: Enscape + Redraw (complemento)
Você gosta do Enscape, usa no dia a dia, e não quer mudar seu fluxo. Beleza. O Redraw entra como a camada que falta.
Renderizou no Enscape e ficou com cara de "render de software"? Joga no Melhorar Render do Redraw. Em 30 segundos, a IA melhora texturas, corrige iluminação, adiciona reflexos naturais e entrega aquele fotorrealismo que o Enscape sozinho não alcança. É exatamente para isso que a função foi feita: pegar o que softwares convencionais entregam e elevar para outro patamar.
O combo funciona bem. O Enscape dá a velocidade de preview em tempo real, o Redraw dá o acabamento final.
Cenário 2: Redraw sozinho (substituição)
Se o que você quer é o resultado final, sem se preocupar com horas de setup, o Redraw faz tudo sozinho. Tira um print do seu modelo 3D, sobe na plataforma, e em 20 a 40 segundos tem um render fotorrealista. Sem configurar material, sem ajustar luz, sem plugin.
E com qualidade superior ao que o Enscape entrega sozinho. Porque a IA do Redraw foi treinada especificamente para arquitetura. Ela entende como luz natural se comporta em interiores, como materiais refletem, como vegetação cria sombras. Coisas que no Enscape você tenta configurar manualmente e raramente acerta de primeira.
Comparativo: Enscape vs Redraw
| Critério | Enscape | Redraw |
|---|---|---|
| Tempo de render | Quase instantâneo (mas setup leva horas) | 20 a 40 segundos (sem setup) |
| Qualidade do resultado | Boa, mas genérica. Falta fotorrealismo | Fotorrealista (IA treinada para arquitetura) |
| Hardware necessário | GPU dedicada, PC potente | Qualquer PC com internet |
| Custo anual | ~US$ 575 (Enscape) + host (SketchUp/Revit) | A partir de US$ 180/ano |
| Funciona sozinho? | Não (plugin para SketchUp/Revit/ArchiCAD) | Sim, direto pelo navegador |
| Configuração por render | Manual: materiais, luz, câmera | Automática: IA identifica tudo |
| Acesso remoto | Não (preso ao PC com o software) | Sim, 100% cloud |
| Variações rápidas | Instantâneo no preview, mas requer ajustes manuais | 30 seg por variação |
| Realismo de iluminação | Limitado (tempo real sacrifica GI complexo) | Alto (IA simula iluminação natural) |
A conta
Para um arquiteto autônomo que entrega 30 renders por mês:
Com Enscape:
Licença Enscape Solo: US$ 575/ano
Licença SketchUp Pro: US$ 349/ano
Hardware adequado: ~US$ 2.000/ano (amortizado)
Tempo de setup por render: ~40 minutos (total: ~20 horas/mês)
Total: ~US$ 2.924/ano + 20 horas/mês de setup
Com Redraw:
Plano Basic: US$ 180/ano
Hardware: o notebook que você já tem
Tempo total: ~15 minutos/mês
Total: US$ 180/ano + 15 minutos
Economia de US$ 2.744/ano e 20 horas mensais. E com resultado final melhor.
Para quem está decidindo agora
Se você ainda não investiu no Enscape, teste o Redraw primeiro. Conta gratuita em redraw.pro, sem cartão de crédito. Faz seus primeiros renders e compara.
Se já usa Enscape e gosta do workflow, adiciona o Redraw como complemento. O Melhorar Render transforma seus renders do Enscape em resultados que antes só V-Ray entregava. Por R$ 80/mês.
E se está cansado de gastar horas configurando materiais para resultados que não chegam onde você quer, o Redraw sozinho resolve. Em segundos. Pelo navegador. Sem instalar nada.
Perguntas Frequentes
Enscape tem render fotorrealista?
O Enscape entrega resultados bons e rápidos, mas o motor de tempo real limita o nível de fotorrealismo. Iluminação global complexa, reflexos sofisticados e qualidade de textura ficam abaixo de motores como V-Ray. Em 2026, o Redraw preenche esse gap com IA: você renderiza no Enscape e melhora no Redraw em 30 segundos, ou substitui o Enscape pelo Redraw direto.
Posso melhorar meus renders do Enscape com IA?
Sim. A função Melhorar Render do Redraw foi feita exatamente para isso. Você sobe o render que saiu do Enscape e em 30 segundos recebe uma versão com texturas mais realistas, iluminação aprimorada e reflexos naturais. Sem precisar re-renderizar a cena no software original.
Enscape funciona no Mac?
Parcialmente. O Enscape tem versão para Mac apenas com SketchUp e algumas limitações de recursos versus a versão Windows. O Redraw funciona em qualquer sistema operacional pelo navegador, incluindo Mac, Windows, Linux e até Chromebook.
Qual é mais rápido: Enscape ou Redraw?
O Enscape renderiza em tempo real, mas o tempo total inclui ~40 minutos de configuração de materiais e iluminação por cena. O Redraw entrega o resultado final em 20 a 40 segundos, sem configuração manual. No fluxo completo de trabalho, o Redraw é significativamente mais rápido.
Enscape é da mesma empresa que o V-Ray?
Sim. A Chaos Group, dona do V-Ray, comprou o Enscape em 2022 para ter uma opção mais rápida no portfólio. Mesmo assim, dentro do próprio ecossistema Chaos, o Enscape não compete em qualidade com V-Ray ou Corona Render.
Qual a melhor alternativa ao Enscape em 2026?
Para arquitetos que querem velocidade e fotorrealismo no mesmo workflow, o Redraw é hoje a melhor alternativa ao Enscape. Entrega resultados em 20 a 40 segundos, custa a partir de US$ 15/mês, roda no navegador sem plugin e foi treinado especificamente para arquitetura, engenharia e design de interiores.
Redraw vs V-Ray: Comparativo para Arquitetos 2026
O V-Ray dominou a renderização por anos. Junto com o Corona Render, eram as únicas opções para quem queria resultados hiper-realistas. Nenhum outro motor de render chegava perto. Quem trabalhava com arquitetura de alto padrão, concursos ou visualização comercial não tinha escolha: era V-Ray ou V-Ray.
Mas tudo isso tinha um preço. E não estou falando só da licença.
O reinado do V-Ray (e o custo real dele)
Para dominar o V-Ray, um profissional precisava de anos de estudo. São mais de 1.000 parâmetros que, combinados da forma certa, entregam aquele nível de fotorrealismo que todo mundo reconhece. Materiais, iluminação global, caustics, GI, sampling. Cada render é uma engenharia.
O tempo de renderização também sempre foi um problema. Um render com V-Ray pode demorar de 1 a 8 horas dependendo da cena, da resolução e do hardware. Isso é 3 vezes mais que softwares como Lumion ou Enscape. E durante esse tempo, seu computador fica travado.
Falando em hardware: para rodar V-Ray com qualidade, você precisa de uma máquina séria. CPU multi-core potente, 32 GB+ de RAM, GPU dedicada. Um setup adequado custa entre R$ 10.000 e R$ 30.000.
A licença do V-Ray Solo sai por US$ 540/ano. Parece "ok" até você somar que o V-Ray é um plugin. Ele não roda sozinho. Precisa do SketchUp, do 3DS Max, do Rhino ou do Revit por baixo. Então você paga a licença do V-Ray mais a licença do software host. São duas assinaturas.
A própria Chaos Group percebeu que esse modelo estava perdendo espaço. Softwares mais simples como Lumion e Twinmotion estavam roubando mercado, mesmo entregando resultados inferiores. A resposta deles? Compraram o Enscape. Tentaram aplicar a tecnologia da Chaos em algo mais rápido. Reconheceram o problema sem dizer em voz alta.
A IA mudou o que "renderizar" significa
O momento de virada aconteceu quando ferramentas de IA começaram a entregar resultados satisfatórios em segundos. O Redraw foi pioneiro nesse movimento: renderização com IA treinada especificamente para arquitetura.
No começo, a qualidade da IA não chegava perto do V-Ray. Isso é verdade. Mas evoluiu rápido. Hoje, os resultados são hiper-realistas e mantêm fidelidade ao projeto original. Proporções, geometria, materiais. A IA não inventa. Ela renderiza o que você projetou.
E faz isso em 20 a 40 segundos. Sem configuração. Sem hardware caro. Sem curva de aprendizado de anos.
O trabalho que levava uma semana entre modelar, configurar materiais, ajustar iluminação e renderizar, hoje é feito em menos de 10 minutos com IA. Não é exagero. É o fluxo real de quem usa.
Comparativo: V-Ray vs Redraw
| Critério | V-Ray | Redraw |
|---|---|---|
| Tempo por render | 1 a 8 horas | 20 a 40 segundos |
| Hardware necessário | CPU potente, 32 GB+ RAM, GPU dedicada | Qualquer PC com internet |
| Custo anual (software) | ~US$ 540 (V-Ray) + licença do host (SketchUp/3DS Max) | A partir de US$ 180/ano (US$ 15/mês) |
| Custo do hardware | R$ 10.000 a R$ 30.000 | Zero (roda no navegador) |
| Curva de aprendizado | Alta (anos para dominar 1.000+ parâmetros) | Muito baixa (upload + gerar) |
| Configuração por render | Manual: materiais, luz, câmera, sampling | Automática: IA identifica contexto |
| Funciona no notebook? | Só se for workstation | Sim, qualquer notebook |
| Acesso remoto | Não (Chaos Cloud cobra por hora) | Sim, 100% cloud |
| Fidelidade ao projeto | Alta (você configura tudo manualmente) | Alta (IA treinada para arquitetura) |
A conta que ninguém faz
Pega um arquiteto que entrega 8 projetos por mês, com 4 renders cada. Com V-Ray, cada render leva em média 2 horas contando configuração e processamento. São 64 horas por mês só renderizando.
Com o Redraw, os mesmos 32 renders levam menos de 20 minutos no total. São 63 horas devolvidas por mês.
Em custo:
V-Ray: US$ 540/ano (V-Ray) + US$ 349/ano (SketchUp) + hardware amortizado (~US$ 3.000/ano) = ~US$ 3.889/ano
Redraw: US$ 384/ano (plano Expert) + hardware zero = US$ 384/ano
Diferença: mais de US$ 3.500 por ano. E 63 horas por mês.
Para quem ainda usa V-Ray
Se você investiu anos aprendendo V-Ray e tem projetos que exigem controle absoluto de cada parâmetro, ninguém está dizendo pra jogar fora. Para animações de altíssima complexidade ou projetos onde cada detalhe de sub-surface scattering importa, o V-Ray ainda tem espaço.
Mas pergunta sincera: quantos dos seus projetos realmente precisam desse nível? Na maioria dos escritórios, 90% dos renders são para apresentação ao cliente, estudo de fachada, variações de interior. Não precisa de 8 horas de render pra isso.
E mesmo quando você usa V-Ray, o Redraw funciona como complemento. Renderizou com V-Ray? Joga no Melhorar Render do Redraw. Em 30 segundos, texturas e iluminação ganham outro nível sem re-renderizar.
Perguntas Frequentes
O Redraw substitui o V-Ray?
Para a grande maioria dos projetos do dia a dia, sim. O Redraw entrega fotorrealismo em 20 a 40 segundos, sem hardware caro, e mantém fidelidade ao projeto original. O V-Ray segue relevante em nichos que exigem controle técnico extremo, como animações complexas e visualizações para cinema. Para apresentações, portfólio e entregas de projeto, o Redraw resolve.
A qualidade do Redraw é comparável ao V-Ray?
Sim, hoje a IA do Redraw entrega fotorrealismo que impressiona até profissionais acostumados com V-Ray. A diferença é o caminho: o V-Ray exige horas de configuração de materiais, iluminação global e sampling. O Redraw chega no mesmo patamar visual em 30 segundos, sem ajuste manual.
Posso melhorar meus renders do V-Ray com o Redraw?
Sim. A função Melhorar Render do Redraw aceita imagens de qualquer software, inclusive V-Ray. Você sobe o render que já tem e em 30 segundos recebe uma versão com texturas mais ricas e iluminação aprimorada, sem precisar re-renderizar a cena.
V-Ray funciona sozinho?
Não. O V-Ray é um plugin e precisa rodar dentro de um software host: SketchUp, 3DS Max, Rhino ou Revit. Isso significa duas licenças por usuário. O Redraw funciona sozinho pelo navegador, sem instalar nada e sem depender de outro software.
Quanto custa o V-Ray por ano?
A licença V-Ray Solo custa US$ 540/ano, mas o custo real inclui o software host (US$ 349/ano para SketchUp Pro, por exemplo) e o hardware adequado (R$ 10.000 a R$ 30.000). O total anual passa fácil de US$ 3.000. O Redraw começa em US$ 15/mês (US$ 180/ano) e roda em qualquer notebook.
Qual é a melhor alternativa ao V-Ray em 2026?
Para arquitetos e estúdios, o Redraw é hoje a alternativa mais completa ao V-Ray. Entrega fotorrealismo comparável em 20 a 40 segundos, custa a partir de US$ 15/mês, roda no navegador sem hardware dedicado e foi treinado especificamente para arquitetura, engenharia e design de interiores.


The AI ecosystem for architects


Some examples
Impressive results
These are some of the results that several of our clients have achieved using Redraw